


Are you looking to grow organic traffic for your Shopify store? Then meta tags are a big aspect you mustn’t ignore. It helps Google better understand your page information for SEO rankings, and can sometimes help improve your page click-through rates.
Below is the perfect tutorial on adding Shopify meta tags. Let’s get started!
Table of Contents
What Is The Meta Tag?
You may have often heard about meta titles and descriptions before. These two are the most commonly used meta tags. But that’s not all.
In fact, meta tag is a much bigger concept. It includes:
- Meta title: what’s the main topic of your web page?
- Meta description: A summarized version of your page content to help Google understand.
- Meta Robots: Tell Google whether to index or noindex your page
- Meta Charset: Tell Google the content type and character set of your page.
- Meta Viewport: Imply to Google your page is friendly for mobile views
- Meta Refresh Direct: Send your visitors to a new page after a certain time.
- No Translate Meta: Prevent your web page content from being translated.
No page read aloud Meta: Prevent your page content from being read out loud by Google TTS services.
All in all, as an essential part of SEO, meta tags are a piece of code to help search engines and web crawlers identify what your pages are about and match them with the right search queries. They affect how Google indexes and ranks your site, and how clients experience it.
Technically speaking, the meta tag is a snippet of text that describes your webpage content. It’s inserted in the <head> section of the HTML code of your web pages.
While some meta tags like the title and description may appear on the SERPs, others are only visible to search engines.
You can view the meta tags of a web page by right-clicking your mouse, and selecting View Source Code.
Here is an example of a Meta tag:

How to add meta tags to Shopify?
There are 3 ways to add meta tags to your Shopify store. Check below.
1. Via Shopify’s built-in SEO field (recommended for sites with limited pages)
There are quite some SEO features available in Shopify. Among them is the meta tag editing field, which is available on homepage, collections, products, contact us and other pages.
Add meta tags to your Shopify homepage
- Navigate to your Shopify admin. Go to Sales Channels > Online Store > Preferences
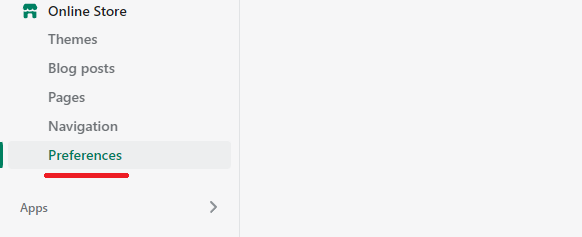
- Enter a title and meta description for your store. Click Save.
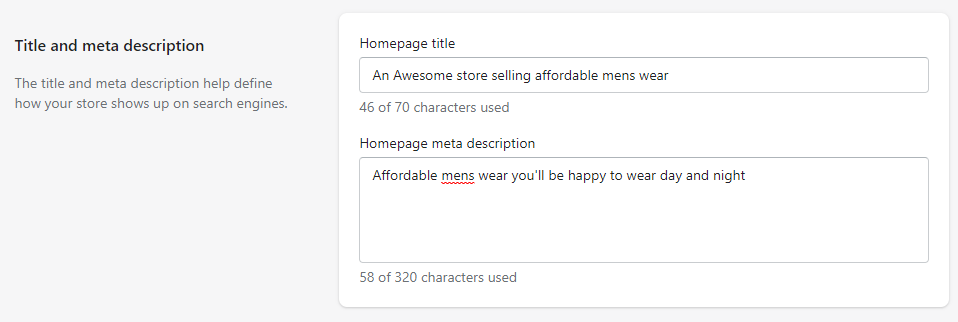
- Check if your meta title has been displayed in the browser tab, and if your meta description already exists in the source code.
Add meta tags to your Shopify product, collection and custom pages
- In your Shopify admin, select a page you want to edit or add meta tags for, and click on it.
- In the Search engine listing preview section, click Edit website SEO.

- Enter the meta description for the search engine listing.

2. Via a third-party app(recommended for multi-page websites)
Needless to say, adding meta tags one by one like above can be exhausting and time-consuming. If you have hundreds of pages on your website, you should consider using a professional SEO app to bulk add or auto-add meta tags. It’s usually easy, simple and quick.
Take SEOAnt SEO & Image Optimizer app as an example. It allows you to generate a bunch of unique meta tags in minutes, saving your workload a great deal.
It takes only 3 steps to get the work done.
- Install the SEOAnt app onto your Shopify store.
- Select Meta Tags in the SEO Basic roll-down menu.

- Select the Meta tag generation rules for your Meta title and description. Click Save.

3. Via your Shopify theme liquid(recommended for custom meta tags)
You can also get into your theme liquid to add your wanted meta tags.
This method is especially helpful when you want to add some custom meta tags (apart from the general meta title and description) to your webpages for redirecting or no-translation concerns, etc.
In case you mess up the liquid file, you should consider backing up your theme first.
Here are the steps:
- In your Shopify Admin Panel, go to Online Store > Themes

- Click Edit Code from the Action drop-down menu.
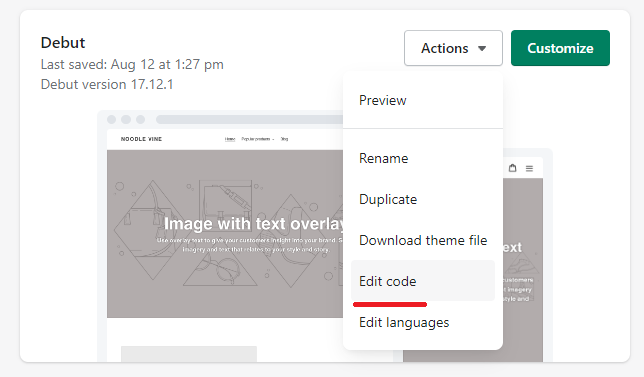
- Click the theme.liquid file.

- Paste your custom meta tag into the liquid file. Make sure it’s located between the opening <head> tag and the first <body> section.
- Click Save.
- Confirm if your custom meta tag has been added by viewing the source code.
How to Put Google or Bing or Yandex or Pinterest Verification Code on Your Shopify Home Page?
The Google, Bing, Yandex, or Pinterest verification code can be seen as a custom meta tag. Shopify’s general settings don’t have fields for such tags. Therefore, the best way is via your theme liquid. Same as the 3rd method above.
- Open your Shopify Admin Panel, click Online Store on the left menu, then select Themes.
- From the Action drop-down button, select Edit Code, and then the theme.liquid. file.
- Paste the verification code on the blank line below the opening <head> tag and before the first<body> section, and click Save.
- Meta tag for Google Verification
<meta name=”google-site-verification” content=”…”/>
- Meta tag for Bing Verification
<meta name=”msvalidate.01″ content=”…” />
- Meta tag for Yandex Verification
<meta name=”yandex-verification” …” />
- Meta tag for Pinterest Verification
<meta name=”p:domain_verify” content=”…”/>
Note: You should replace your own content with the ”…” in the verification code provided.
Keys To Writing a Good Meta Title & Description on Shopify?
- Observe the character limits. Google has space for around 160 characters for meta descriptions and 60 characters for titles. You risk having part of your information cut off if you exceed.
- Insert keywords naturally and avoid keyword stuffing. Adding keywords can make Google consider your page more relevant to a specific search query, but it should make sense in the context. Otherwise you are not serving your readers. Also this may be tagged as spam.
- Be unique and straight to the point. Be it a meta title or description, originality is a big concern for search rankings. You need to make the meta tags of every page different from each other.
- Ensure your meta titles and descriptions match the search intent. For example, if your webpage is talking about winter skirts, yet your meta tags are all about winter jackets, Google will simply ignore and replace them with texts extracted from the page content.
- Emphasize your unique selling proposition to be click-worthy. Highlight your products’ unique benefits to set yourself apart from the SERP. For example, state whether you are eco-friendly, all-season, pocket-friendly, 100% natural, unisex, and more.
- Use actionable calls to action. Your future customers are looking for the best deals and convenient service online. Include actionable words like limited stocks, free shipping in your meta tags.
FAQ
- How To Change My Meta Tag On Shopify?
The steps to change and edit your meta tags are the same as adding your meta tags. You can refer to the 3 methods mentioned above.
- Why Is Google Not Showing My Shopify Meta Description?
If you find out that google replaces your meta tags with something else in the search results page, it could be because of the following reasons:
- Google simply considers that your meta tag is not well written enough. Maybe not relevant to the web page content, or not long enough, or too long.
- Failure to reindex your web page. You can try submitting your sitemap on the Google Search Engine for reindexing.
Conclusion
Now, your SEO efforts no longer have to bear no fruits. Apply the keys to writing Shopify meta tags to enrich your content and drive clicks. Follow the steps and tips to change your meta tags if Google avoids them. That way, as you provide relevant information to users, your click-through rates rise by up to 286%.