
In addition to your Shopify store’s SEO rankings being determined by what you are selling and how, SEO technical setups have a big impact. However, many Shopify owners have some level of difficulty implementing technical SEO setups to see improvement in their rankings.
Technical SEO can be intimidating, especially if you are a beginner to ecommerce, but it is really easier than you think. In many other ecommerce platforms, you would have to manually configure dozens of options in their user admin, but Shopify has really automated a lot of the technical setup for you.
In this guide, we will review everything you need to know about setting up Shopify for search engines. You’ll discover all the important technical SEO setups for URL structure, meta tags, sitemaps, and schema markup. You are either launching a new store or updating an older store, so this step-by-step way of showing you is certain to help you develop a technically sound store to build up a long-term SEO foundation.
Let’s get started on the Shopify technical SEO essentials every store owner needs to know.
Table of Contents
Understanding Shopify SEO Technical Requirements
Before diving into configurations, it’s crucial to understand what makes technical SEO for Shopify unique compared to other platforms. Shopify is a hosted e-commerce solution, meaning it manages many technical aspects like hosting, security certificates, and core site structure automatically. This is both an advantage and a limitation.
The platform comes with built-in SEO features that handle fundamental requirements out of the box. Your store automatically generates an XML sitemap, creates canonical tags to prevent duplicate content issues, and provides mobile-responsive themes. However, these default settings aren’t always optimal for every business model or competitive landscape.
Shopify SEO optimization requires understanding three core technical components: crawlability (how search engines access your content), indexability (which pages should appear in search results), and rankability (technical factors that influence your position in search results). Each component involves specific configurations that we’ll address throughout this guide.
How to Configure Shopify for Search Engines
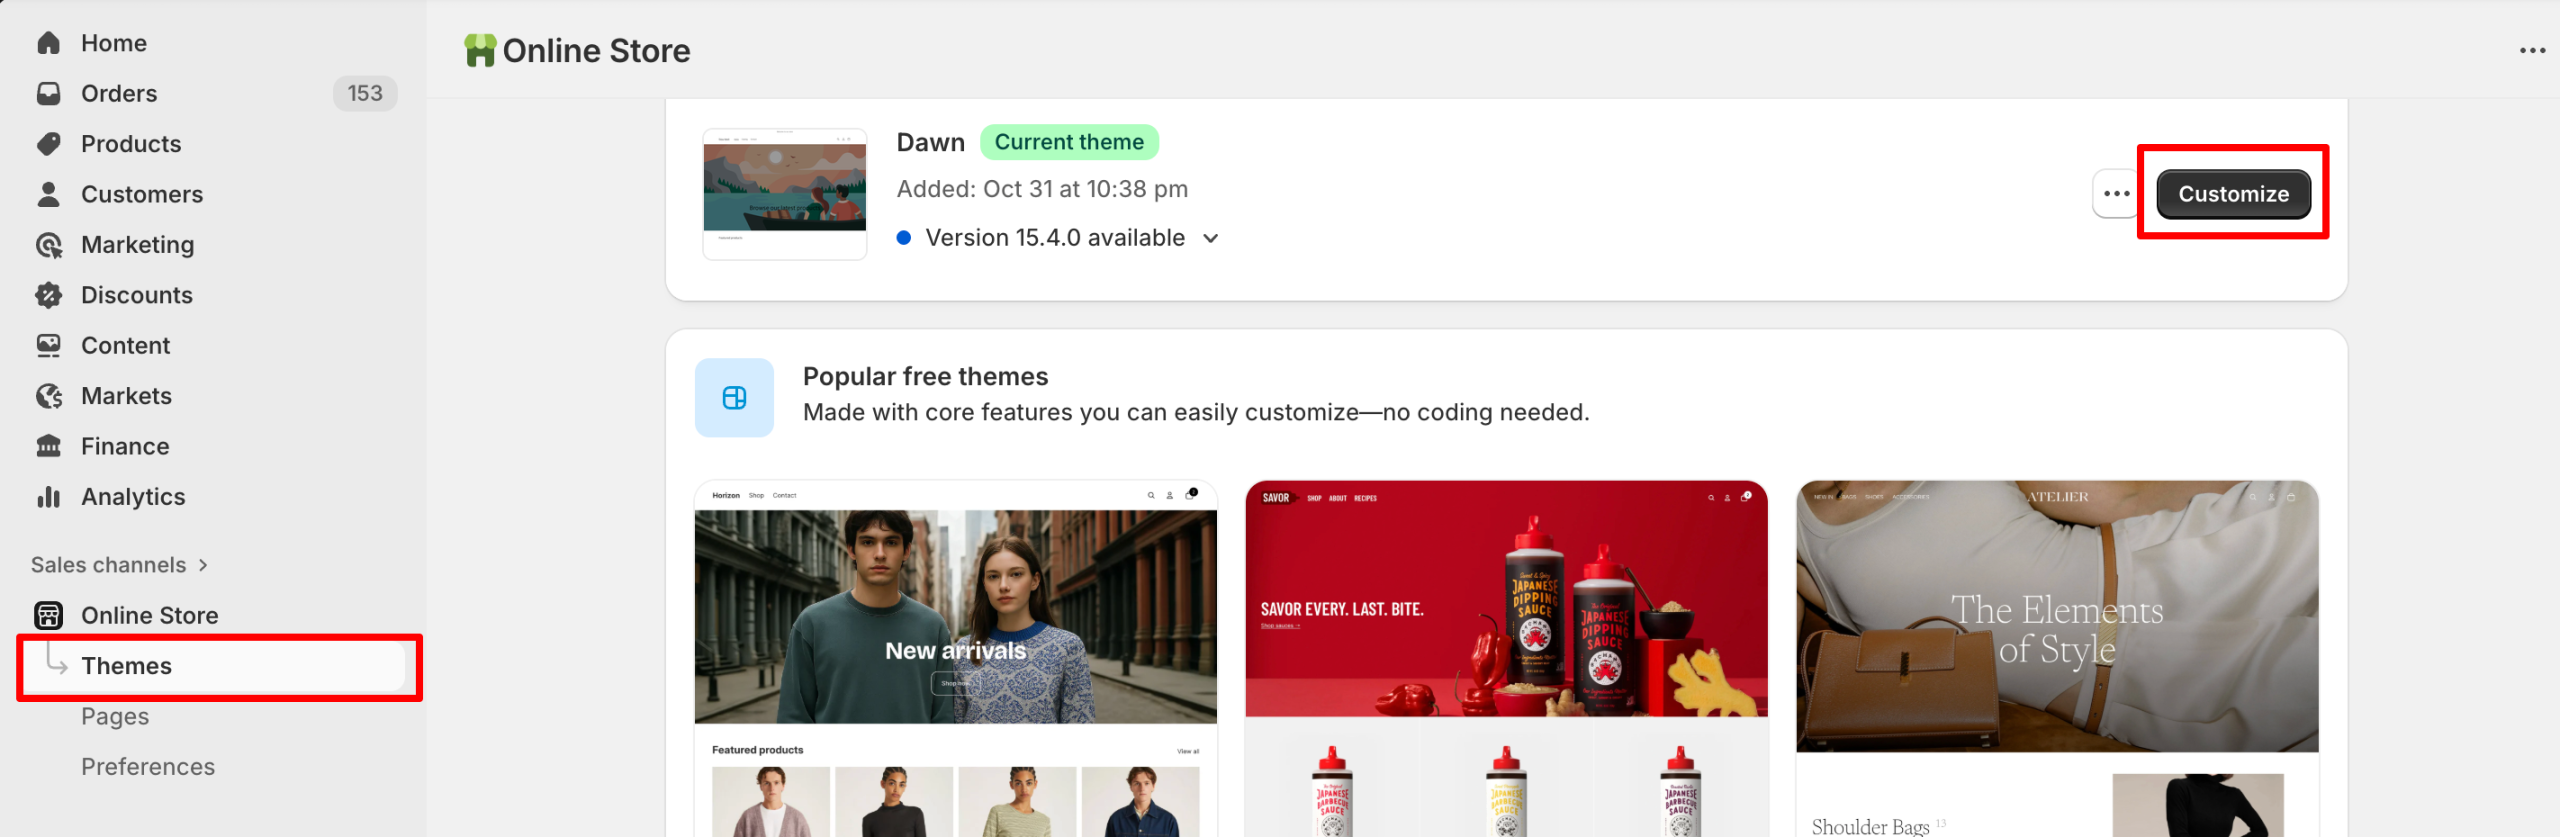
Accessing your Shopify SEO setup begins in the Shopify admin panel. Navigate to “Online Store” and then “Preferences” to find your primary SEO settings. This section controls fundamental elements like your homepage title and meta description, which serve as your store’s primary search engine identity.
Your Shopify admin also provides theme-level settings that affect technical SEO. Under “Online Store” > “Themes” > “Customize,” you’ll find options to modify header structures, navigation elements, and other components that influence how search engines interpret your site architecture.
It is essential to know what the differences are between store-level settings and page-level settings. Store-level settings (like sitemap visibility and robots.txt) are store-wide, while page-level settings (like metadata and URLs) can have their own settings at the product and collection level, and for blog posts. You can control both the enterprise-level consistency, i.e., which elements display across the store, as well as the page-level adjustments, where you optimize based on each item (tweaking headers, customizing product details, etc.).
For beginners, however, the good news is that the SEO layer of Shopify is simple. Most changes occur naturally after you have figured out where things are in your admin panel. Generally, all important changes are in your admin panel first, which is easy to navigate the most critical settings and all are clearly labeled and described. Further, Shopify has automatic backups, making it easy to play with settings with confidence you can’t really break your store.
Essential Shopify Technical SEO Configuration
With a solid understanding of Shopify’s technical framework, let’s move into the essential Shopify SEO configuration steps that every store owner should implement immediately. These foundational settings directly impact how search engines crawl, interpret, and rank your store.
Shopify URL Structure Optimization
Your Shopify URL structure optimization is one of the most critical technical SEO elements, yet it’s often overlooked by beginners. Shopify automatically generates URLs based on your product titles and collection names, but these default URLs aren’t always ideal for SEO or user experience.
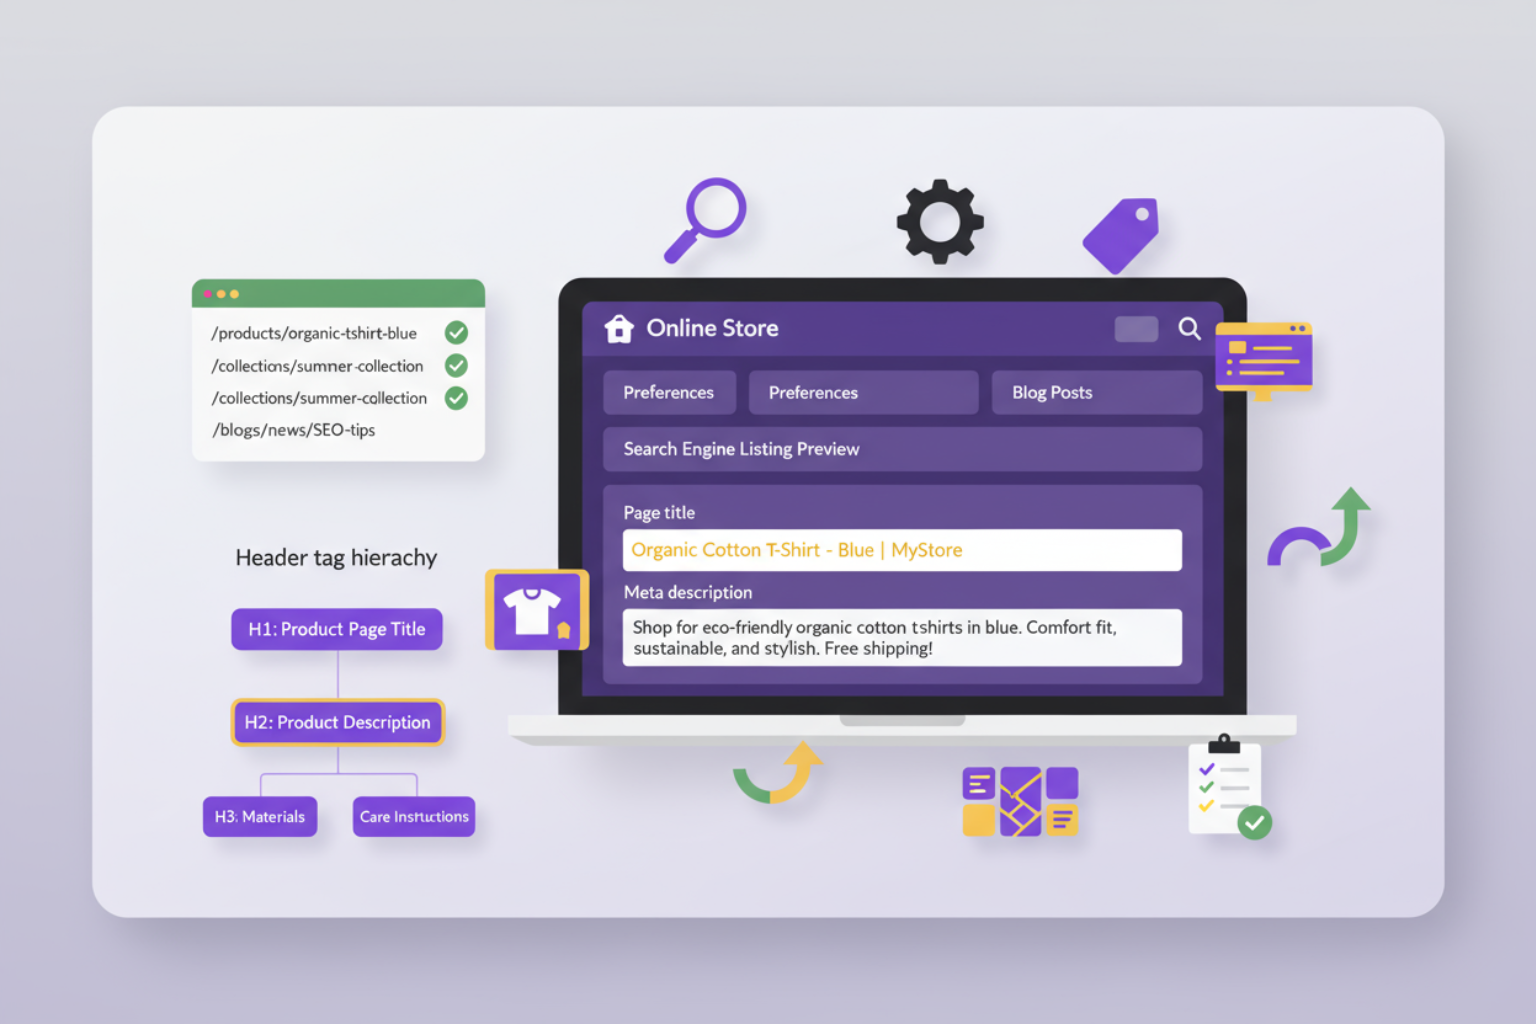
When creating products and collections, Shopify generates a URL handle—the part of the URL that comes after your domain name. For example, a product titled “Men’s Organic Cotton T-Shirt – Blue” might default to /products/mens-organic-cotton-t-shirt-blue. While functional, you could optimize this to /products/organic-cotton-tshirt-blue for better readability and keyword focus.
To enhance URL structure, follow these recommendations: as much as possible, keep URLs fewer than 60 characters in length, include your primary keyword in a natural way, use hyphens (rather than underscores) to separate words, and don’t include unnecessary parameters or dynamically generated strings. Remember that once a page has been published, changing a page’s URL creates a redirect – more on that later.
Shopify automatically includes collection and product prefixes in your URLs (/collections/ and /products/ respectively), which you can’t change without custom code. Again – not an ideal situation from an SEO perspective, but this is true for all Shopify stores, and will not significantly affect rankings. Focus instead on optimizing the handle aspect that you can control.
For blog posts, Shopify is a bit more flexible. You can go to “Online Store” and “Blog Posts”, then “Manage Blogs” to see the URL editing options. You can create descriptive, keyword-rich URLs here too, just keep it concise, factual to the topic of content and user friendly.
Setting Up Shopify Meta Tags
Shopify meta tags serve as your direct communication channel with search engines, telling them what each page is about and how it should appear in search results. Properly configured meta elements can significantly impact your click-through rates and overall Shopify SEO technical performance.
Start with your homepage meta configuration. In your Shopify admin, go to “Online Store” > “Preferences.” Here you’ll find fields for your homepage title and meta description. Your title tag should be 50-60 characters and include your primary keyword and brand name. For example: “Premium Organic Clothing | EcoThreads Sustainable Fashion.”
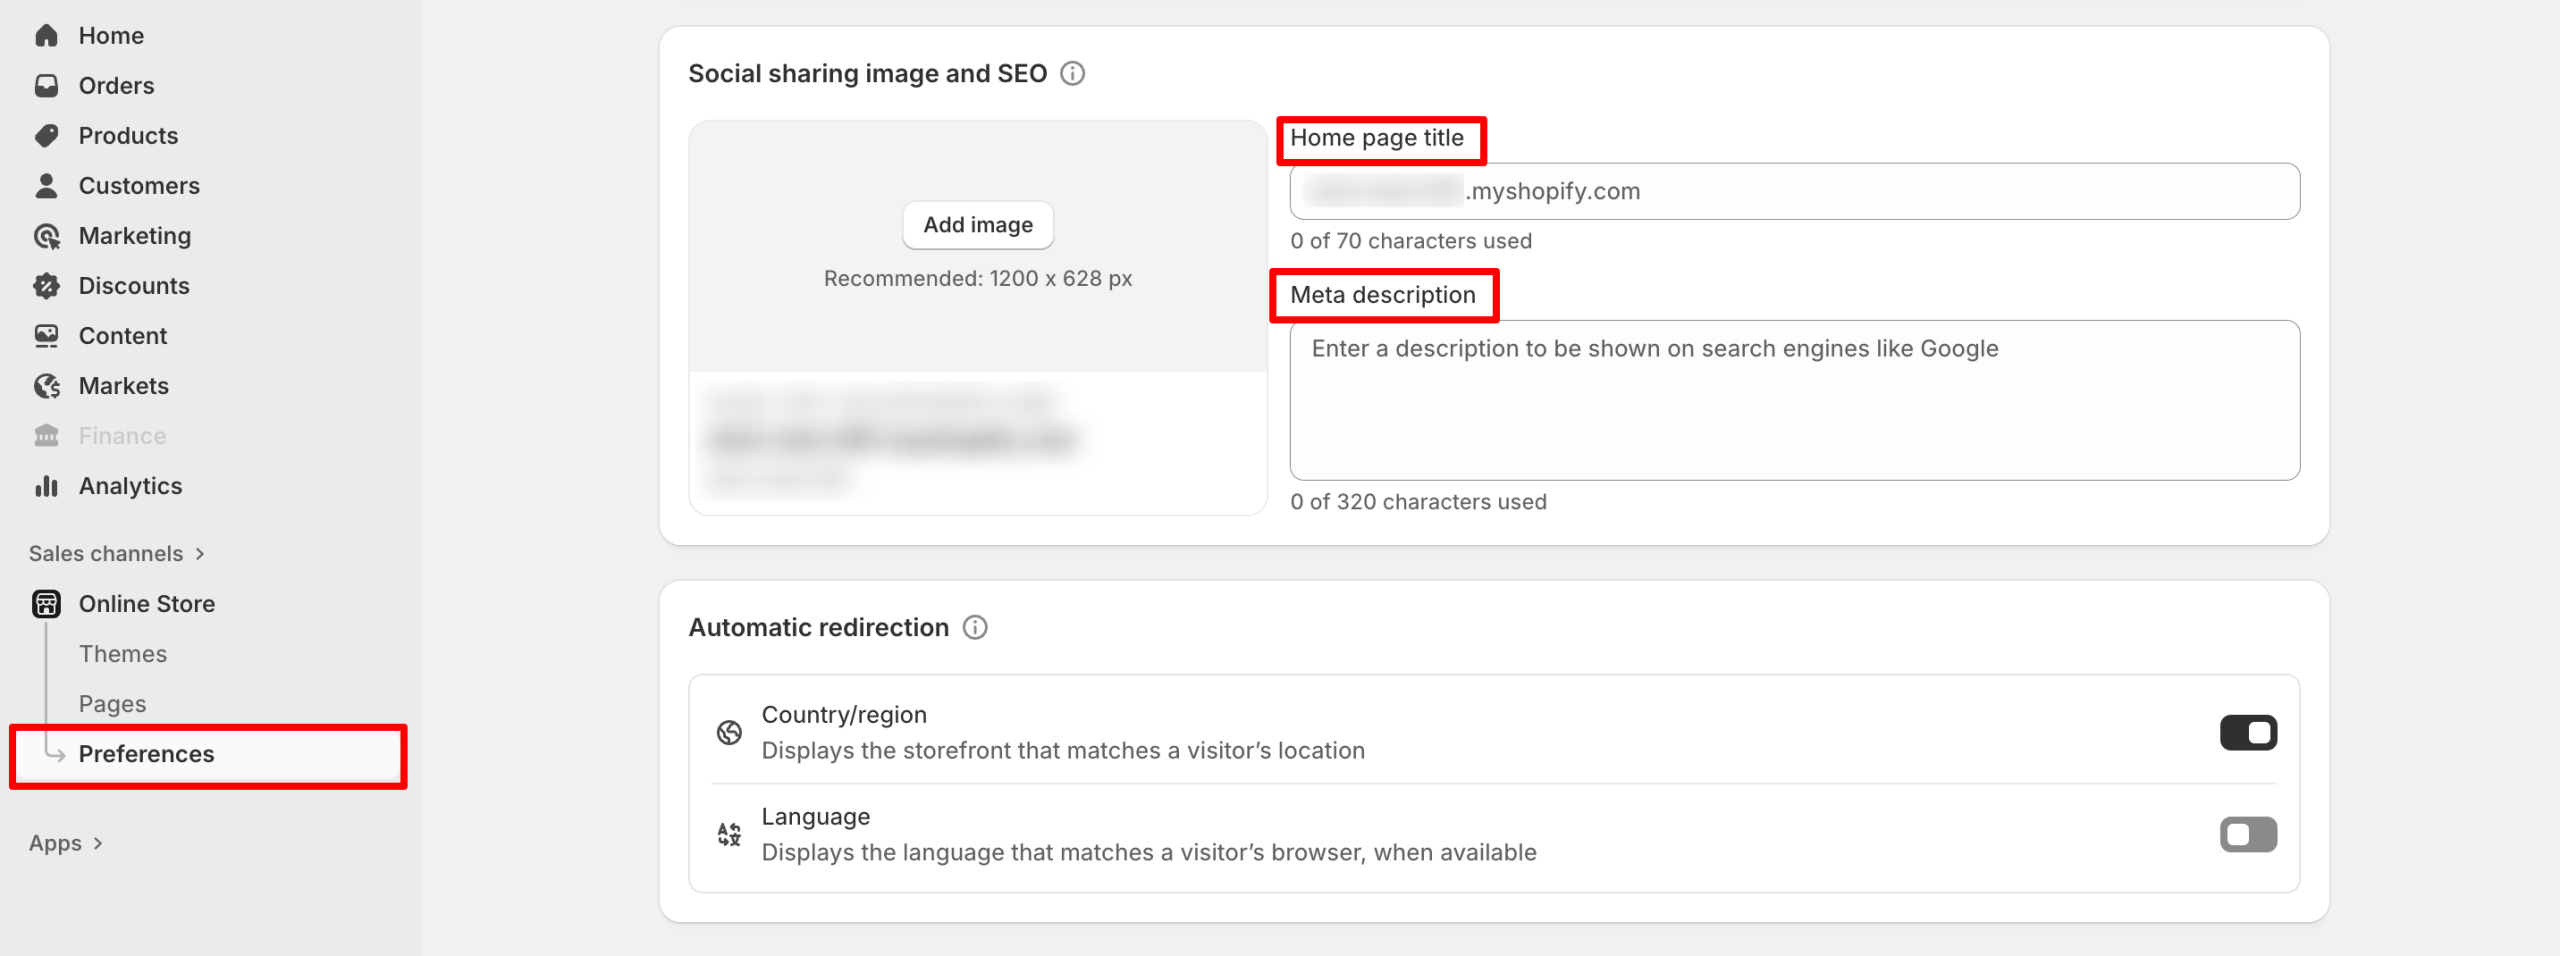
A meta description can range between 150–160 characters to convince searchers to click on your result instead of a competitor’s one. Use your main value proposition, your primary keyword in a natural way, and a subtle call-to-action. For example: “Explore ethically-made organic clothing that look good and feel even better. Free shipping on orders over $50. Shop sustainable fashion today.”
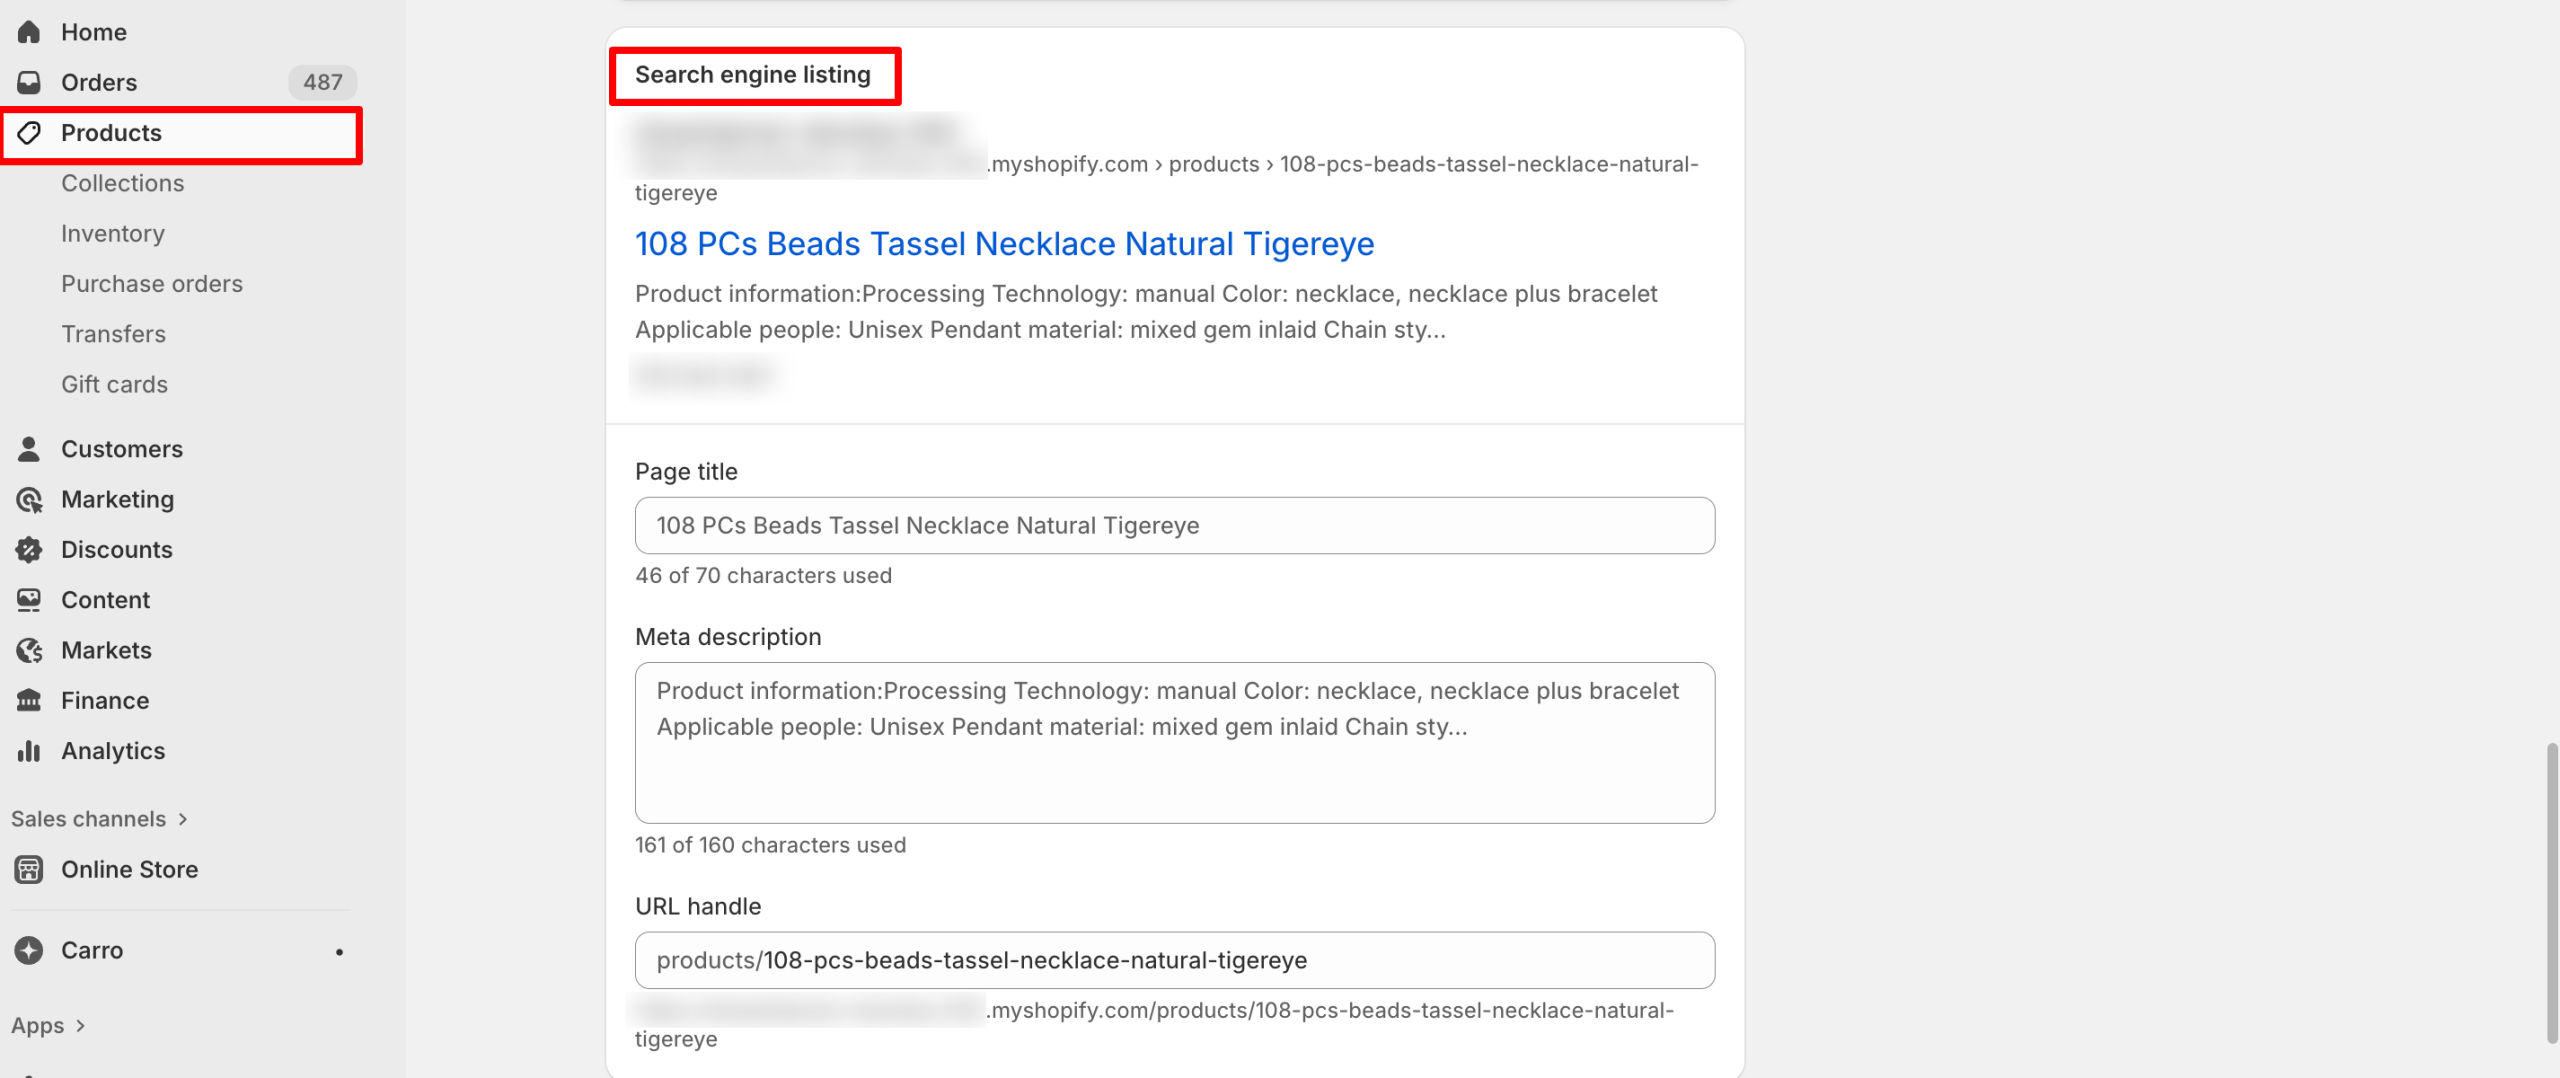
On product pages, Shopify has specific fields dedicated to SEO inside each product page editor. Click into a product, scroll to the bottom of the page until you see “Search engine listing preview,” and then customize the title and description. The title tags for the product page should contain the name of the product, key feature or benefit, plus the product category. Product page titles should stay on topic focused around the product and keyword-rich but shouldn’t be spammy.
Collection pages follow this same pattern. Head to the bottom of the collection page and find the “Search engine listing preview” section where you can edit custom fields like title and meta description. Like product pages, collection meta titles can be enhanced by including the number of products like (“Shop 50+ Organic T-Shirts”) or by including key categories or subcategories viewable from the main URL (“Men’s & Women’s Sustainable Fashion”).
For blog posts, the title and description meta fields are the same location as products and collections. Blog titles are likely slightly longer and have a more engaging rhetoric since they support informational blog post titles rather than commercial intent. Like products, your target keyword can be placed early in the sentence alongside being written in a way to earn a click.
Configuring Header Tags and Content Hierarchy
Optimizing header tags properly will help search engines understand the structure and hierarchy of your content. Most Shopify themes will handle some of this for you automatically, but still need to check to verify and optimize how header tags are being implemented across your store.
For the homepage, each product page and collection page, you should be using only one H1 tag (page title, typically). In most cases, the default of most Shopify themes will implement the H1 tag so you may not have to worry about this, but it is always a good idea to check. Use the inspect element function of your browser or an SEO browser extension to verify that you are using H1 tags and that they include relevant keywords.
For product descriptions and blog posts, use H2 tags for major sections and H3 tags for subsections within those sections. This helps create a logical hierarchy to your content, which is easy for both users and search engines to follow. For example, in a product description, H2 tags could include features, specifications, care instructions, etc., with H3 tags being subcategories under those.
You will see the most structural benefit using header tags in blog posts. Your article title will be labeled an H1 (automatically done for you at Shopify), then H2 for major sections and H3 for subsections of those sections. Also include relevant Shopify SEO technical related keywords in the headers, as long as they do not interfere with readability. Prioritize processors and ease of readability over keyword stuffing in this part of your content.
Optimizing Your Shopify Site Structure
Beyond page-level elements, your overall Shopify site structure significantly impacts crawlability, user experience, and SEO performance. A well-organized store makes it easy for both customers and search engines to find and understand your content.
Creating an SEO-Friendly Navigation System
Your navigation system serves as both a user experience tool and a powerful SEO signal. Shopify navigation structure should be logical, comprehensive, and optimized to help search engines understand your store’s content organization.
Start with your main navigation menu. Access this through “Online Store” > “Navigation” in your Shopify admin. Your primary menu should include your most important collections, essential pages (About, Contact), and any key content hubs like your blog. Limit top-level menu items to 5-7 options to avoid overwhelming users and diluting link equity.
Implement drop-down menus for subcategories under main collection headers. For instance, a “Women’s Clothing” menu item might expand to show “Tops,” “Bottoms,” “Dresses,” and “Accessories.” This creates a clear hierarchy while keeping your main navigation clean.
Don’t neglect your footer navigation—it’s valuable for both users and SEO. Footer links often include less critical but still important pages like shipping policies, returns, sustainability commitments, or FAQ sections. These pages contribute to your overall site authority and can rank for long-tail keywords.
Breadcrumb navigation enhances both user experience and SEO by showing the path from homepage to the current page. Most modern Shopify themes include breadcrumbs automatically, but verify they’re implemented correctly. Breadcrumbs create internal links, help search engines understand site structure, and can appear in search results as rich snippets.
Internal Linking Strategy for Shopify
Strategic internal linking Shopify implementation distributes link equity throughout your store and helps search engines discover and understand relationships between your pages. A well-executed internal linking strategy can significantly boost your overall Shopify store SEO performance.
Link related products within product descriptions. If you’re selling a yoga mat, naturally link to complementary products like yoga blocks or carrying straps within the description text. Use descriptive anchor text that includes relevant keywords rather than generic “click here” phrases.
Utilize Shopify’s built-in related products feature, which creates automatic internal links based on tags or collections. While these links have limited SEO value compared to in-content links, they still contribute to crawlability and user experience.
Your blog presents the biggest internal linking opportunity. Every blog post should include 3-5 internal links to relevant products, collections, or other blog posts. For example, an article about “Sustainable Fashion Trends” should link to your sustainable clothing collections and related blog content.
Collection pages can link to relevant blog content through custom HTML blocks in the collection description. This bidirectional linking between informational content and commercial pages creates a robust internal linking structure that benefits both users and SEO.
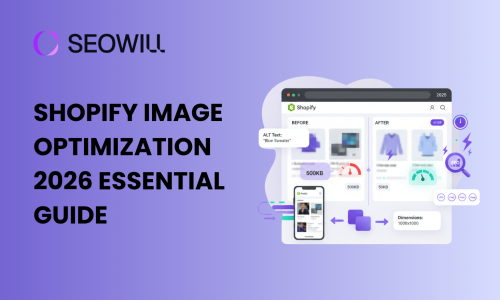
Optimizing Shopify Image SEO
Images are crucial for e-commerce, but they also present technical SEO challenges and opportunities. Shopify image optimization involves multiple factors: file naming, alt text, compression, and proper implementation.
Before uploading images to Shopify, rename files with descriptive, keyword-rich names. Instead of “IMG_1234.jpg,” use “organic-cotton-blue-tshirt-front.jpg.” This provides context to search engines before they even process the image’s alt text.
Alt text Shopify configuration is non-negotiable for proper Shopify SEO technical implementation. Alt text serves multiple purposes: accessibility for visually impaired users, context for search engines when images fail to load, and ranking factor for image search. Write descriptive alt text that explains what’s in the image while naturally incorporating relevant keywords.
Image file size directly impacts page load speed, a confirmed ranking factor. Compress all images before uploading—aim for under 100KB for product images without sacrificing quality. Tools like TinyPNG or Shopify apps can automate compression while maintaining visual appeal.
Implement lazy loading to defer offscreen image loading until users scroll. Most modern Shopify themes include lazy loading automatically, but verify this feature is enabled in your theme settings. This improves initial page load time, especially on product collection pages with dozens of images.
Advanced Shopify SEO Technical Settings
Once you’ve mastered the essentials, several advanced technical configurations can further enhance your Shopify technical SEO checklist and give you a competitive edge in search rankings.
| Aspect | Key Actions | Notes & Best Practices |
| Sitemap Overview | Shopify automatically generates your sitemap at yourstore.com/sitemap.xml. | Acts as a roadmap for search engines to crawl and index your content. |
| Sitemap Structure | Includes separate sitemaps for products, collections, blog posts, and pages. | Review periodically to ensure no duplicate or irrelevant pages. |
| Sitemap Submission | Submit to Google Search Console and Bing Webmaster Tools. | In GSC → “Sitemaps” → Add yourstore.com/sitemap.xml. Helps faster content discovery. |
| Robots.txt Basics | Shopify auto-manages robots.txt, blocking admin and checkout pages. | Manual editing is limited on Shopify’s hosted platform. |
| Custom Noindex Setup | Use meta robots noindex tag in theme Liquid files. | Useful for hiding thank-you, test, or promotional pages. |
| Index Coverage Monitoring | Track via Google Search Console → Coverage Report. | Shows indexed, excluded, and error pages. Fix crawl errors promptly. |
Shopify Schema Markup Setup
| Schema Type | Purpose | Implementation Tips |
| Product Schema | Helps display product details (price, availability, reviews) in SERPs. | Shopify themes include basics; enhance with apps like Judge.me, Loox, or Yotpo. |
| Organization Schema | Communicates brand info (logo, social links, contact) to search engines. | Add via JSON-LD in theme code for potential knowledge panel visibility. |
| Breadcrumb Schema | Improves navigation visibility and user experience in search results. | Often prebuilt in modern themes; verify with Google Rich Results Test. |
| Review Schema | Displays star ratings in SERPs to boost CTR. | Implement via review apps that include structured data markup. |
| Testing & Validation | Use Google Rich Results Test to detect errors and preview results. | Test regularly after theme updates or code changes. |
Setting Up 301 Redirects in Shopify
| Purpose | Action Steps | Best Practices |
| Prevent Broken Links | Navigate to Online Store → Navigation → URL Redirects → “Create URL Redirect.” | Always use 301 (permanent) redirects to preserve SEO equity. |
| Automatic Redirects | Shopify auto-generates redirects when handles change. | Regularly audit to remove redirect chains that slow load time. |
| Bulk Redirects | Use CSV upload for large-scale URL changes or site migrations. | Download Shopify’s CSV template to import redirect pairs. |
| Monitor 404 Errors | Check Google Search Console → Coverage → Not found (404). | Redirect important URLs with prior backlinks or traffic to maintain SEO value. |
Shopify Performance and Technical Optimization
Page speed and performance are confirmed ranking factors and critical components of Shopify page speed optimization. While Shopify’s hosted infrastructure provides a fast foundation, several optimizations can further enhance your store’s technical performance.
Optimizing Shopify Page Speed for SEO
Shopify page speed optimization starts with theme selection. Choose lightweight, well-coded themes with built-in performance optimization. Many free themes are actually faster than premium alternatives because they include fewer features and less complex code.
Your installed apps significantly impact page speed since most inject JavaScript or CSS into your theme. Audit your apps regularly and remove any that aren’t essential. Each additional app potentially adds load time, so be selective about which functionality truly justifies the performance cost.
Image optimization remains the single biggest opportunity for most stores. Beyond compression mentioned earlier, implement modern image formats like WebP when possible. Some Shopify themes and apps automatically convert images to WebP for browsers that support it, with fallbacks for older browsers.
Minimize custom code and third-party scripts. Every custom font, tracking pixel, and embedded widget adds HTTP requests and increases load time. Evaluate whether each script is truly necessary, and consider combining or deferring scripts where possible through theme customization.
Shopify’s built-in CDN (Content Delivery Network) automatically distributes your content across servers worldwide, reducing load time for international visitors. This feature requires no configuration—it’s automatically active for all Shopify stores. However, you can maximize its benefit by ensuring your content is cacheable and optimized.
Use Google PageSpeed Insights and Core Web Vitals metrics to measure performance. Focus particularly on Largest Contentful Paint (LCP), First Input Delay (FID), and Cumulative Layout Shift (CLS)—Google’s primary speed metrics. These scores directly impact your Core Web Vitals Shopify performance and search rankings.
Shopify Mobile SEO Optimization
With Google’s mobile-first indexing, Shopify mobile SEO optimization is non-negotiable. Fortunately, Shopify themes are mobile-responsive by default, but several optimizations ensure optimal mobile performance.
Test your store on actual mobile devices, not just desktop browser emulation. Real device testing reveals issues that browser tools might miss, particularly around touch targets, navigation usability, and font readability. Test on both iOS and Android devices if possible.
Ensure all interactive elements are appropriately sized for touch. Buttons, links, and form fields should be at least 48×48 pixels to accommodate average finger size. Most Shopify themes handle this correctly, but custom elements might need adjustment.
Mobile navigation should be intuitive and accessible. Hamburger menus are standard on mobile Shopify themes, but ensure your menu hierarchy is shallow enough for easy navigation. Three levels deep (main category > subcategory > item) is typically the maximum for good mobile UX.
Mobile page speed is often slower than desktop due to network limitations. Prioritize mobile performance by minimizing above-the-fold content, deferring non-essential resources, and ensuring critical content loads quickly. Google’s Mobile-Friendly Test tool identifies mobile-specific issues.
Test your checkout process on mobile devices thoroughly. While checkout optimization extends beyond pure SEO, a smooth mobile checkout experience reduces bounce rates and improves overall site quality signals that indirectly impact rankings.
Fixing Common Shopify Technical SEO Issues
Even with careful configuration, certain technical SEO issues commonly arise on Shopify stores. Understanding how to identify and resolve these problems is essential for maintaining optimal Shopify SEO technical performance.
Handling Shopify Canonical Tags
Shopify canonical tags setup helps prevent duplicate content issues, which occur when the same content is accessible through multiple URLs. Shopify automatically implements canonical tags on most pages, but understanding how they work helps you identify potential issues.
Product pages with multiple variants (like different colors or sizes) all display under a single URL with the canonical tag pointing to that main product URL. This is correct behavior—don’t try to create separate URLs for each variant as it creates duplicate content problems.
Collection pages can be accessed through multiple URLs if a product belongs to multiple collections. Shopify’s canonical tags typically point to the original collection where the product was first added, preventing duplicate content penalties while allowing flexibility in product categorization.
For pages accessible through multiple navigation paths, verify canonical tags point to the preferred version. Use your browser’s “View Page Source” function and search for “rel=canonical” to check which URL the tag references. It should always point to the definitive version of that content.
If you discover incorrect canonical implementation, it usually requires theme-level code adjustment. Most issues stem from custom template modifications or apps that inadvertently affect canonical tag generation. Consult with a Shopify expert if you identify systematic canonical tag problems.
Resolving Indexation Problems
Shopify indexing issues can prevent your pages from appearing in search results despite correct technical configuration. Google Search Console is your primary tool for identifying and diagnosing indexation problems.
Common indexation errors include pages blocked by robots.txt (usually intentional for admin and checkout pages), pages with noindex tags (check if these are intentional), and soft 404 errors (pages that return success codes but contain little or no content).
If important pages aren’t being indexed, verify they’re included in your sitemap and linked from other pages on your site. Orphan pages (those not linked from anywhere) often struggle to get indexed because search engines have difficulty discovering them.
For newly added pages, use Google Search Console’s URL Inspection tool to request indexing. This prompts Google to crawl the page more quickly than waiting for automatic discovery. However, don’t overuse this feature—Google limits how many requests you can submit.
Search visibility problems sometimes stem from crawl budget limitations. While this rarely affects small to medium Shopify stores, larger stores with thousands of products might benefit from prioritizing which pages search engines crawl. Remove low-value pages from your sitemap and navigation to focus crawl budget on important content.
Monitor your Index Coverage report weekly to catch new issues early. Sudden drops in indexed pages often indicate technical problems that need immediate attention. Conversely, unexpected increases might reveal unwanted pages being indexed that should be excluded.
Shopify SEO Technical Monitoring and Tools
Implementing technical SEO configurations is just the beginning—ongoing monitoring and optimization ensure sustained performance. Several tools and practices help you maintain and improve your Shopify store SEO over time.
Google Search Console is your most important free SEO tool. It provides direct insights from Google about how your store appears in search results, which queries drive traffic, and any technical issues affecting performance. Set up weekly email alerts to stay informed about critical issues.
Google Analytics 4 tracks user behavior and traffic sources, helping you understand which technical optimizations drive results. Pay attention to organic search traffic trends, landing page performance, and user engagement metrics. Declining organic traffic often signals underlying technical or content issues.
For more advanced analysis, consider tools like Ahrefs, SEMrush, or Moz. These paid platforms provide comprehensive site audits that identify technical SEO issues, track keyword rankings, analyze backlinks, and monitor competitors. Monthly audits help catch emerging problems before they impact rankings significantly.
Shopify-specific SEO apps can automate various technical optimizations and provide user-friendly interfaces for managing SEO elements. Popular options include Plug in SEO, SEO Manager, and Smart SEO. These apps offer automated audits, bulk optimization tools, and simplified management of meta tags and structured data.
Create a regular technical SEO maintenance schedule. Monthly tasks should include checking Google Search Console for errors, reviewing page speed metrics, auditing installed apps for performance impact, and verifying critical pages remain indexed. Quarterly reviews should include comprehensive site audits using professional SEO tools.
Document your technical SEO setup and any customizations you make. This documentation becomes invaluable when troubleshooting issues, training team members, or working with SEO consultants. Include details about app installations, custom code modifications, and specific configuration choices with their rationale.