
How to Boost Visibility & Sales with Shopify Structured Data
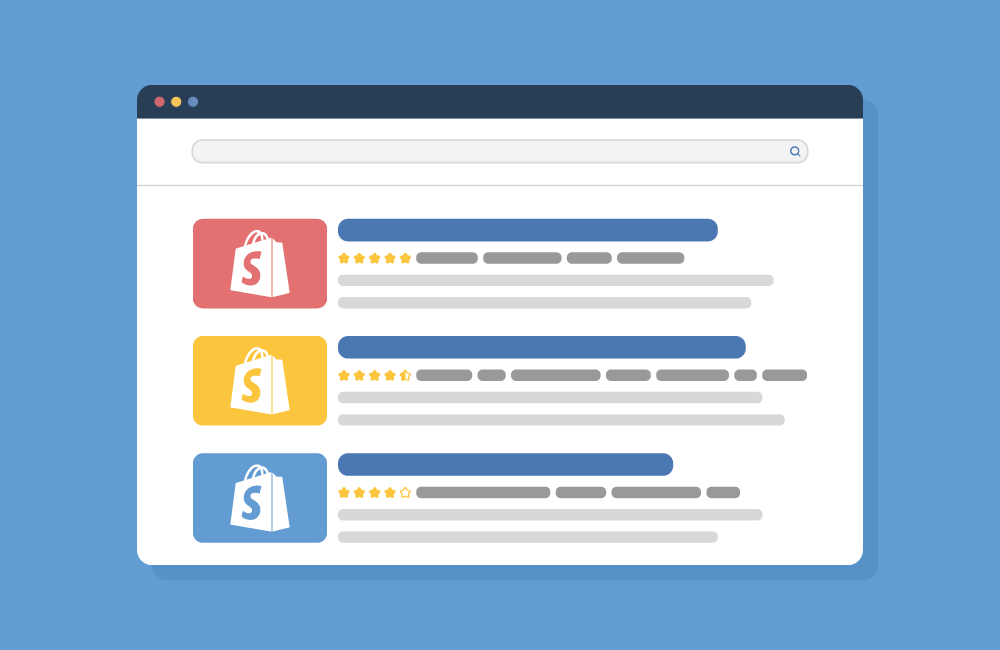
Now, have a look at these two types of search results. Which one would you want to click?
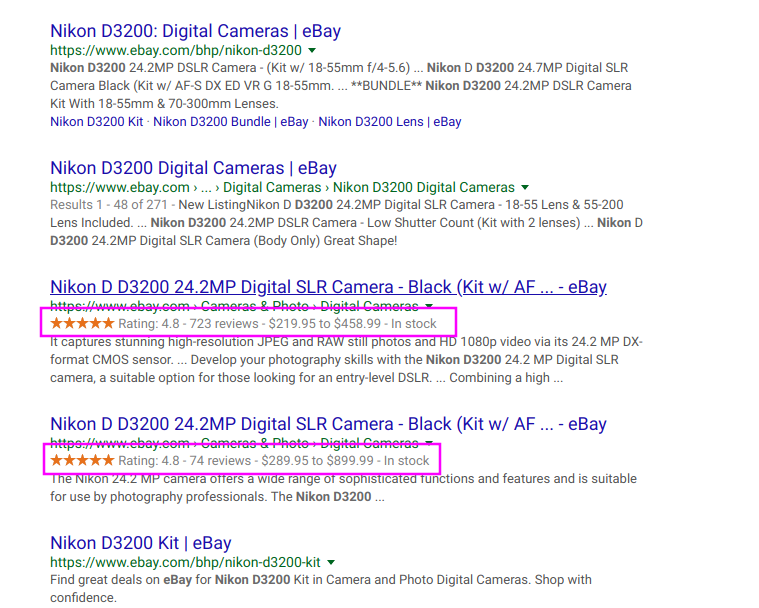
Most likely, you’d go for the ones below, right? It’s more visually appealing and looks more trustable, with reviews, stars, etc all well-organized in one place, while the other one simply comes with a link and a short description.
As a Shopify store owner, don’t you want the same for your website? This way, it becomes easier for customers to find your pages, and even want to click on them. Using structured dathe ta like above is one simple way to achieve this purpose. It also helps Google understand the content on your website better and display it in rich snippets.
If you are unsure what structured data is and how to implement it, then this guide is for you.
What is Structured Data?
Structured data is the use of a specific type of formatting and coding to present valuable information about your web page, including:
- Product titles
- Product description
- Pricing
- Product images
- Product availability
- Shipping options
- Product variants
- Reviews and ratings
- Founder
- Subsidiaries
- Address and contact info
- Social media
With this data, search engines can better interpret your page, match it more accurately with the target searchers, and display it in a way that is informative and attractive to them in the SERP listing.
If you want to take your Shopify store to a new level in search traffic, you can consider using structured data on your store.
How Can Structured Data Improve your Shopify Store?
Structured data is not a ranking factor itself. Yet it has many amazing benefits you shouldn’t miss.
Higher click-through rates with rich snippets: Rich snippets are enhanced search results that include additional details about a page, such as ratings, reviews, and product details. This can help your store stand out in the search results and attract more clicks.
Build up brand authority: If your website has consistently authoritative high-quality content, your structured data may be included by Google into its Knowledge Graph Card. The Knowledge Graph displays information about prominent entities, such as businesses or organizations, in search results. Being a part of this feature can boost your brand’s reputation and establish trust among potential customers.

Improved SEO performance: Structured data gives Google a breakdown of your page’s layout and content, helping Google understand and classify your pages better. This will ultimately lead to more accurate search results for users, potentially raising your rankings.
Dominate local search: You can use physical location to your advantage with structured data by marking up your business information, such as your address with the schema.org “LocalBusiness” type. This can help your store show up in local search results and attract more foot traffic to your store.
Faster indexing: Structured data provides additional details about your webpage in a format that is easily interpretable by search engines, leading to quicker and more comprehensive indexing.
Enhanced customer experience and conversions: Structured data on your Shopify store allows visitors to easily find the detailed info they may need. This includes answering common questions like:
- Your store’s reliability, as shown by its 5-star rating.
- Your store’s location in relation to the customer.
- Your store’s hours and contact information, making it easier for them to connect with you and make purchases.
- Product specifications, dimensions, material, size, reviews, color, and price.
- Product availability, discounts, promotions, and special offers.
- High-quality images
All these can help customers make informed decisions about their purchase, leading to a better overall experience in your store, and can help increase trust and credibility with potential customers, hence converting more.
A better understanding of customer behavior: Structured data can help you better understand how customers interact with your website. For example, if you use structured data about the age, gender, and location of your customers, you can know if certain age groups or genders are more likely to make purchases.
If you wish, you can also check if there are certain locations where you see higher customer activity levels. In essence, you can use structured data to track customer behavior over time and see how it changes. This can be useful for identifying trends or patterns in your customer base.
Common Types of Structured Data
- Reviews: Almost everyone checks reviews before purchasing online. So if your store has good reviews, maximize it. Display customer reviews, with stars indicating your product ratings.
- Organisation/Person: This includes details about your business or personal brand. An example is an image of a business card with your name, contact information, and business location on your store.

- FAQ: A section with a list of FAQs answers will help customers find the answers they need quickly and easily.
- Video: These are videos added to your website, either individually or as part of a larger piece of content. For this, you could add a video player to your site with a thumbnail image of the video.
- Recipes: A recipe with ingredients and cooking instructions on a product page, is a perfect example, complete with other data like nutritional content, calories.
- Product Markup: Usually, it includes name, price, and availability, as well as promotions about a product or service you offer.
- Events: Here, you display details about events happening on your website, such as special offers and partnership.
- Customer data: This includes their names, order date, region, etc, helping you segment your customers and tailoring your marketing efforts to specific groups.
Shopify Structured Data Formats
Shopify provides multiple structured data formats to boost the online presence of your online store. Three main types of structured data are commonly used for Shopify. They are:
JSON: JSON-LD is a type of structured data that uses JavaScript Object Notation (JSON) to organize and format data. It is placed in a script tag at the head of a webpage, and it provides information about a page in a machine-readable format.
It is considered the easiest format to use as it does not require any changes to the existing HTML code. It is also the most recommended type by Shopify because it is easier for search engines to understand.
You can simply add JSON as one independent block of code in your page.
Microdata and RDFa: Midrodata and Resource Description Framework are other more difficult formats. Both use HTML tags and attributes to organize and format data. Implementing them requires changes to the HTML code. If you have a developer team onboard, you can consider these two types.
This complexity and their difficulty to be maintained is why they are less commonly used. They can also be relatively harder for search engines to understand.
Nonetheless, they are supported by major search engines and provide additional context to search engine algorithms.
In summary, all three formats are supported by Shopify. However, JSON-LD is the most recommended format by Google. John Mueller from Google made this clear by saying the following in a Webmaster hangout:
“We currently prefer JSON-LD markup. I think most of the new structured data that are kind of come out for JSON-LD first. So that’s what we prefer.”
JSON-LD is also the most fitting structured data format for Shopify merchants as it is less complicated and does not require much technicality and effort to maintain.
Structured Data Schemas
Now that you’ve known types of structured data, the next thing you must know is that all structured data needs to follow a particular format: data schema.
Structured data is the extra information about your pages provided to search engines. While data schema is the language or format in which you present that information. Both can affect your website’s visibility.
You can think of data schema as the pillar for structured data, as it offers a standardized format for all structured data on the internet.
Using a data schema like data-vocabulary.org or schema.org allows you to present your structured data in a format that is easily understood by search engines.
Schema.org is a more widely supported vocabulary developed by a collaboration of major search engines. Data-vocabulary.org, on the other hand, has been discontinued by Google. Therefore it’s not recommended.
With data schemas, your structured data will be formatted correctly whether by a developer or with a tool that implements it. By that, it is easier for search engines to extract relevant information from your Shopify store.
How to Add Structured Data to Your Shopify Store?
Can’t wait to boost your Shopify store’s visibility by adding structured data? But where do you start? Here’s a simple guide.
1. Use a Shopify SEO app like SEOAnt
There are many apps on the Shopify store that can help you generate detailed structured data efficiently and properly in JSON-LD format. Take SEOAnt for an example which ranks top 3 in the Shopify store, it can create structured data for every product on your collection pages, ensuring search engines better understand and interpret the content of your store for potentially higher rankings and traffic.
Here are the steps to add structured data to your Shopify store using SEOAnt:
- Install SEO&Image Optimizer
- Go to the dashboard, and select Snippets- JSON-LD. Select your desired structured type for different pages.
- Start customizing details like URLs, text, logo, etc. Click Save to keep the changes.
- Click Enable to activate the structured data.
SEOAnt is more than just structured data. It also offers a variety of features to improve your store’s SEO such as automatic meta tags generation, rich snippets, and analytics. With a 4.9/5 rating and a free plan (the paid one at just $9.99/month+), SEOAnt is a cost-effective solution for boosting your store’s SEO. Don’t let your store get lost in the sea of competition.
Don’t miss out on the benefits of structured data – get SEOAnt now.
2. Use Google’s Structured Data Markup Helper tool
Google’s Structured Data Markup Helper is a tool that allows you to add structured data to your website by manually highlighting and tagging the relevant content on your webpage. Here’s how you can use it:
- Go to the Structured Data Markup Helper website
- Select the type of data you want to mark up from the dropdown menu. For example, if you want to mark up a product page, you would select “Product.”
- Enter the URL of the page you want to mark up in the “URL of the page” field.
- Click the “Start Tagging” button.
- The Structured Data Markup Helper will load the page and allow you to highlight and tag the relevant content. For example, you can highlight the product’s name and select the “Name” tag from the toolbar.
- Continue highlighting and tagging the relevant content on the page.
- When you are finished, click the “Create HTML” button to generate the structured data code.
- Copy the code and paste it into the HTML of your Shopify store.
3. Do it from scratch manually
To do it manually, you will need to edit the HTML of your store’s pages and add the appropriate schema code. Here’s a general outline of the process:
- Identify the type of schema you want to use. Many types of schemas are available, depending on the type of content on your store. For example, you can use a “Product” schema to mark up a product page or a “Recipe” schema to mark up a recipe page.
- Choose the type of structured data you want to add. Remember that JSON-LD is generally easier to work with.
- Add the structured data code to the HTML of your webpage. You can do this by inserting the code into the <head> or <body> of your HTML document.
- Test your structured data to make sure it is correctly implemented. You can use Google’s Structured Data Testing Tool to test your structured data and see if there are any errors or warnings.
Overall, manually adding structured data to your Shopify store can be very technical. If you’re unfamiliar with HTML and schema code, you may end up messing up your HTML code and negatively impacting your store’s performance. This can result in wasted time and lost revenue.
What structured data markup should you add to your Shopify store?
Different pages usually require different structured data for maximum SEO effects. But how do you make sure you are adding the right type of structured data markup for the right pages? Check below.
Structured data markup for your Shopify product pages
Three basic data types are usually recommended for your product pages: Product, Offer, and BreadcrumbList. They all help search engines understand what your products are and how they’re related to other pages on your site.
Product data: This is the most important type of data for your product pages. This data describes the product itself, including its name, image, and offers or product variants. Some recommended properties to include in your product data are:
- productID
- aggregateRating (average review score)
- brand
- description
- review
- sku (unique Stock Keeping Unit)
- global identifiers (gtin8, gtin13, gtin14, mpn, isbn)
Offer data: This type of data describes product variants and should include:
- availability (e.g. InStock, OutOfStock)
- price
- priceCurrency
Recommended properties for Offer data are:
- itemOffered
- priceValidUntil (in ISO 8601 date format)
- url (the URL of the product page)
- itemCondition
- sku
BreadcrumbList: This data helps search engines understand how your products are categorized. The BreadcrumbList type should include at least one ListItem type, which should have the following properties:
- position
- item
- id
- name
When you have these types of data on your product pages, your products may likely stand out in the SERPs and lead to more clicks.
These data types can also be used together.
Structured data markup for your Shopify homepage
To add structured data markup to your Shopify homepage, you should include the following data types:
- WebPage: To provide information about the homepage itself.
- BreadcrumbList: To show the hierarchy of the homepage within the website and help users understand the context of the page.
- Organization: To provide information about your business, such as your name, URL, description, logo, and contact information.
For the ‘WebPage’ data type, you should include the following properties:
- “mainEntityOfPage” property with the homepage’s URL to specify the main content of the page.
- “headline” property with the homepage’s title to provide a brief summary of the page’s content.
- “datePublished” property with the date the homepage was first published to specify when the page was first available on the web.
- “dateModified” property with the date the homepage was last updated to indicate when the page was last revised.
- “author” property with the homepage’s creator to attribute authorship of the page.
- “publisher” property with the name of the website’s publisher to indicate the entity responsible for publishing the page.
- “about” property with a brief summary of the homepage’s main content to provide additional context for users.
For the ‘BreadcrumbList’ data type, you should include the following properties:
- “itemListElement” property with a list of “BreadcrumbListItem” to indicate the hierarchy of the homepage within the website.
- “itemListElement” properties should have “position” and “item” properties, the position of the breadcrumb in the hierarchy and the name and url of the breadcrumb respectively.
For the ‘Organization’ data type, you should include the following properties:
- “name” property with your Shopify store or website’s name
- “url” property with your website’s URL
- “description” property with a brief summary of your business.
- “logo” property with the URL of your organization’s logo.
- “sameAs” property with links to your social media profiles.
- “address” (PostalAddress) property with “streetAddress”, “addressLocality”, “postalCode”, and “addressCountry” properties to provide your organization’s physical location.
Structured data markup for your Shopify collection pages
The following key elements will help search engines understand the content on your collection pages.
- CollectionPage: This markup tells search engines the page is a collection page, and includes information about the page itself. Make sure it has the following properties:
- name: To help users understand what the page is about.
- url: To find the page.
- Description: To give users an idea of what the collection is about.
- Image: To give a visual representation of the collection.
- ListItem: Helps search engines understand that the page contains a list of items. You should include one ListItem type for each product on the collection page, and and the following properties:
- position: To tell search engines the order of the products.
- url: This will help users find the product page.
- BreadcrumbList: This helps search engines understand the hierarchy of your website. This will help users understand where the collection page fits into the overall structure of your website.
Structured data markup for your Shopify article/blog pages
You can use structured data markup to provide more information about the article title, author name, and publish date. Here are the properties you should add in the “Blog” data type:
- “about” – the subject of the article
- “headline” – the headline of the article
- “mainEntityOfPage”
- “image” – the cover image of the article
- “url” – URL of the article
- “dateModified”
- “datePublished”
- “dateCreated”
- “description” – a description or an excerpt of the article
- “articleBody” – the body of the article
- “author”
- “publisher”
- “logo” (publisher logo)
- “name” (publisher name)
What to Note When Implementing Structured Data?
Structured data implementation is not difficult itself. Yet, sometimes one wrong move and you could negatively impact your website SEO or even face penalties from Google. Here are a few key considerations to keep in mind.
1. Read Google’s Webmaster Guidelines & General Structured Data Guidelines
You don’t have to be perfect when implementing structured data on your website. But at least, you should avoid getting marked as spam, penalized, or not properly indexed. That’s where these guidelines come in. What better than to hear the best practices from the horse’s mouth?

2. Choose your primary pages
For Shopify, the main page types are homepage, collection, product, blog, and article pages. They should be considered as primary pages as they are likely to receive the most traffic and have the greatest impact on your SEO.
3. Decide the types of structured data your Shopify pages should contain
After choosing primary pages, you should decide the structured data they should contain, as different pages may require different types of structured data to be effective.
For example, a product page may benefit from structured data that includes the product’s price, availability, and ratings. For a news article page, you can consider adding the author profile and publication date.
4. Test your structured data markup
You need to ensure your implemented structured data markup is being read by search engines. Use free tools like Google’s Rich Results Test and JSON-LD Playground to run a test.
Why isn’t my structured data not showing up?
There is no guarantee for Google to display your structured data in the SERPs even if you do everything right. Google tailors search results to provide the best experience for users, based on factors such as user search history, location, and device type.
However, there are still things you can bear in mind to increase the likelihood for your structured data to be properly recognized by Google.
- Outdated or Irrelevant Structured Data: If the content referred to by the structured data is outdated or no longer relevant, Google may choose not to display it in search results.
- Incorrectly formatted URLs: If the URL in the structured data does not match the actual URL of the page, Google may be unable to find the page and the structured data will not be displayed.
- Incorrect type: If you have specified the wrong type of structured data, it may not be recognized by search engines. For example, using “Product” structured data on a blog post page instead of “BlogPosting” structured data. This could prevent you from getting rich snippets.
- Missing required fields: Some types of structured data require specific fields for Google to understand your content. One example of this is the “name” field in the “Organization” structured data type. If this field is missing, the structured data may be ignored by Google.
- Violations of the guidelines: Some violations of the structured data guidelines can cause it not to show up, such as fake reviews, impersonation, etc. Click here to know more.
- Indexed though blocked by robots.txt file: If you have a robots.txt file that disallows crawling all or some of your pages on your website, Google will not be able to access their structured data.
- Misrepresentation or Misleading Structured Data: If the structured data does not accurately represent the main content of the page, Google may choose not to display it in search results.
What are the cons of structured data?
While structured data can present your page information in an organized manner, it also has its downsides.
- Limited flexibility: Structured data is typically less flexible than unstructured data, as it has to follow a specific format. It may not be able to accommodate the updates in your web page’s content.
For example, if a product’s price changes, the structured data will also need to be updated to reflect the new price. Otherwise, search engines will display incorrect information to users.
- Difficulty in handling:
Structured data may need a lot of resources to store and process, which can potentially slow down your site speed. Therefore you must use the lightweight JSON-LD format. Mishandling could easily result in errors in the search results. So you should either use a professional app or hire a developer team.
Wrapping up
In fairness, who doesn’t like to instantly know more of a product before purchasing? Compared to a thin search result with only a title, a meta description and a link, who doesn’t trust a store with high-quality images and appealing, rich content like golden stars, high ratings, special attributes more? Customers don’t just buy your products, but also buy how pleasant and trustworthy your pages make them feel.
With structured data, you can provide your customers with all these details in an easy-to-find format.

How to Add a Favicon to Your Shopify Store? (Updated 2023)
Did you know that a favicon can promote brand awareness for your Shopify store? That’s right. That tiny icon next to the web address on a browser tab can help imprint your brand logo and name in the minds of target users who visit your Shopify page. In turn, this can lead to new or repeat customers.
That said, would you like to know how to add favicon to Shopify? This guide is the perfect place to learn. Keep reading.
What Is a Favicon on Shopify?
Favicon means “favorite” and “icon” combined. It is usually a small square image, pixel icon, or brand logo shown next to the title tag and web address in any browser tab.
For a Shopify favicon, you are allowed to use any image, but the store logo is often the best option. It acts as a strong branding message, also a cue for visitors to remember your store. Once added, your brand gets more visible to visitors on the address bar.
Visitors can use the favicon to identify your page. Alternatively, they may use it to locate your store’s website in their bookmarks list if they bookmark your site.

Why Do You Need a Favicon for Your Websites?
A favicon may seem like a tiny thing, but it can make or break your online store. Wondering why? Below are some reasons:
- To build credibility and trust
If your Shopify web pages don’t have a favicon, browsers will display a generic gray icon or the default blank document instead. In such a case, when a user is comparing your store and a competitor’s, they are likely to have little faith in yours. Hence, having a favicon can help improve credibility.
- Increases brand recognition
Favicons are like your website’s ID, helping visitors recognize your site among many tabs. Also, since images are easier to recall than texts, users may remember your store’s favicon before they read the page title. Logos can ingrain themselves into a customer’s mind quickly. Once this happens, it is easier for the client to remember your company and its name.
- Follow up visits
People are likely to revisit your Shopify store if they recognize your favicon in search results, bookmarks, or even browser history. For example, when a browser history has multiple entries with long names, people will likely click on a familiar icon.
- Save user’s time
If a visitor comes across your Shopify page in a hurry, he may decide to bookmark and check it out later. Due to the rush, he may only have time to notice your store’s favicon. This makes it easier to identify the page later from his bookmarks and saves him valuable time.
Best Shopify Favicon Size
16*16 or 32*32 pixels is the perfect Shopify favicon size. However, if the image you use is too large, Shopify will automatically scale it to 32*32 at upload time. So you shouldn’t worry too much about the image dimensions.
However, since favicons are displayed in tiny sizes, ensure the image or words are of high resolution.
Best Shopify Favicon Format
Shopify favicons support JPG, PNG, GIF and ICO image files. ICO is usually more popular, because it’s smaller and supported by all major browsers. PNGs are used more commonly for Android and iOS devices.
Other file formats may not show on internet explorer.
It also depends on your theme. Some may only accept .png or .ico files.
How to Add a Favicon to Shopify?
There are two ways to add a favicon on Shopify: directly via the theme settings, or by editing the code in the theme.liquid file. Let’s check each below.
Add a Favicon in the Theme Settings
You can access Shopify theme settings via a computer or a mobile phone. The steps differ in each case.
On Desktop
- Go to the Shopify Admin panel, and then click Online Store > Themes.
- Locate the theme you intend to edit and click Customize.
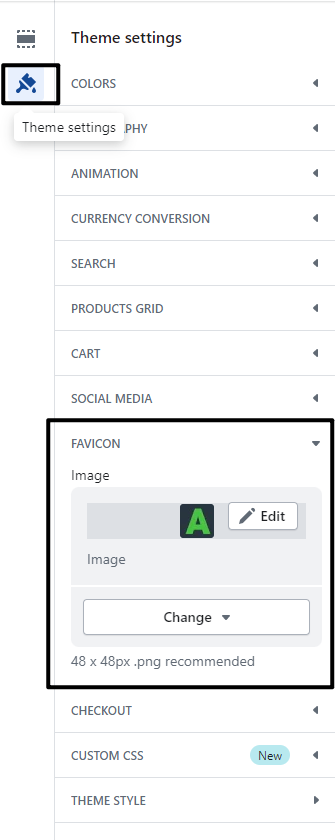
- Go to Theme Settings > Favicon.

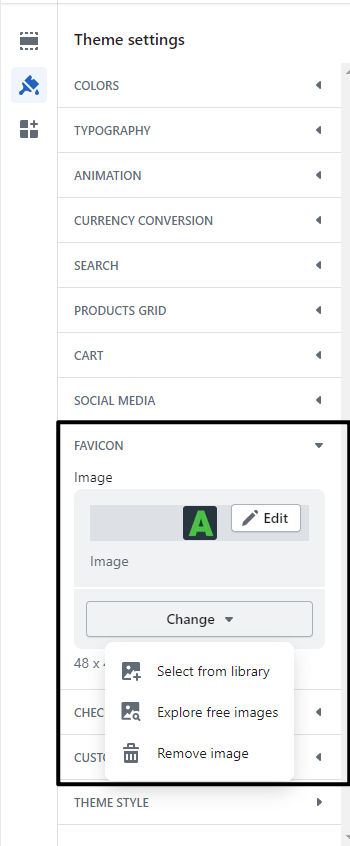
- Under Favicon image, click Select image, then do one of the following:
- Click the Library tab to select a picture you already uploaded to your Shopify admin.
- Click the Library tab, then hit Upload to pick an image from your local storage.
- To add alt text to the favicon image, click Edit, then enter a brief description in the Edit image window and hit Save.
- Click Save to add the favicon.
On Mobile (For Android and iOS)
- Open the Shopify app and tap Store.
- Navigate to Sales Channels and tap Online Store > Manage themes.
- Locate the theme you intend to edit and tap Customize > Edit > Theme Settings > Favicon.
- Under Favicon image, press Select image, then do one of the following:

- Click the Library tab to select a picture you already uploaded to your Shopify admin.
- Click the Library tab, then hit Upload to pick an image from your local storage.
- To add alt text to the favicon image, click Edit, then enter a brief description in the Edit image window and hit Save.
- Click Save to add the favicon.
Tip:
Some Shopify themes allow you to add alt text to your favicon. Browsers then display the alt text when the favicon can’t load. Screen readers or voice assistants can also read out the alt text to describe the favicon image to visual users.
Add a Favicon in the theme.liquid File
This method is more complex than adding the favicon via settings. It requires editing your store’s code.
Before you start, ensure your image’s file name consists of the correct name and extension: i.e., my-favicon.ico or my-favicon.png. If it doesn’t, it will display incorrectly.
Steps:
- Go to your Shopify admin panel, then click Online Store > Themes.
- Locate the theme and click Customize.
- Press Theme Settings > Theme Actions > Edit Code.
- Scroll down, then click Assets > Add New Asset.
- Press choose a file, select the image file you want to use, then click Upload asset.
- Scroll up to the Layout folder, select it, then click theme.liquid. Code will be displayed on your screen.

- You need to find the </head> tag. To locate it quickly, press ctrl + F, type ‘</head>’ into the search bar, and hit enter.
- Paste the following code above the </head> tag, <link rel=”shortcut icon” href=”{{ ‘favicon.png’ | asset_url }}” type=”image/png” />. If your image has a .ico extension, replace favorite.png with favorite.ico.
- Click Save.
How to edit, change, update the favicon on my Shopify store?
The steps are the same as adding a favicon. Either navigate to your Shopify theme settings and replace the image, or change the asset and asset URL in the theme.liquid file.
Once you add or change your store’s favicon, refresh the page, then check if the favicon is displayed. If not, don’t panic, I have some solutions below to help you troubleshoot.
What to Do if My Favicon Isn’t Appearing on My Shopify Store?
If your favicon doesn’t show up, first check if it’s in the correct format (.png, .gif, or .ico), or of the right size (16*16 or 32*32 pixels). Then check if you named it correctly (favicon.png, favicon.ico, or favicon.gif).
You can also try refreshing the page just in case the favicon is cached by your browser. Refreshing the page can show an updated version, especially if you’ve just uploaded it.
If this doesn’t work, try clearing your browser’s cache and cookies. This often fixes the issue.
If you are still experiencing trouble, contact the Shopify support team for help.
How to Create a Favicon for My Shopify Store?
Since Shopify lacks a built-in favicon generator, you need to create your own. Here are 4 different ways to do that:
- Use a third party favicon generator – Enter “free favicon generators” on the Google search bar. Select one from the search results to generate your favicon in seconds.
- Use an image editor – This is a good option if you have image editing skills or have a designer onboard, with tools like Photoshop, Fireworks, Corel paint, or more.
- Use your company logo – This method is the easiest one. You don’t need to remake an icon from scratch but simply resize your existing logo to 16×16 or 32×32 pixels. Plus, using your logo as the favicon increases your brand recognition too!
- Use free, open-source software – These include tools like Luminar, Pixen, GIMP and Inkscape, among others. However, you need some coding skills to use them, which can be challenging.
Conclusion
Favicons on Shopify can convince a client to buy from your page or even come back to your site after the initial visit. After reading this guide, you now know how to add, edit, change, update a favicon in Shopify. Take your time to create and upload a unique and highly recognizable favicon!

6 Best Practices for Product Description Optimization
A product description is a good SEO-friendly strategy for boosting your eCommerce website, and there’s a right way to do it.
Besides providing your users with a superb customer experience, optimizing your product descriptions boosts the overall visibility of your eCommerce store and website online. For this reason, it’s essential that you get it right.
In this article, I’ll be divulging the secrets of the best product description optimization practices. I’ll show you how you can implement strategies like audience analysis to achieve great SEO-friendly results.
Without any further ado, let’s jump right into the good stuff.
What Is a Product Description?
As you may have guessed, product descriptions are the write-ups you use to explain what your products are, their features, benefits, the problems they solve, and why they are the best products on the market for solving that problem.
They are those blocks of text in your product pages that effectively describe your products to your customers.
The truth is, even though your customers need your product descriptions, you also need them badly. Product descriptions help you get more conversions and purchases.
A product with no description at all will get fewer purchases than one with a description. Even though the high-quality pictures of your products go a long way towards increasing your sales, you also require those descriptions too.
Product descriptions answer every possible question a prospective customer may have about your product.
Additionally, product descriptions help the shopper make a more informed buying decision, especially when they have doubts about your products. That will prevent abandoned carts and reduce the number of inquiry emails you’ll have.
Finally, product descriptions help your SEO rankings indirectly. That’s because, with clear and detailed product descriptions, customers are less likely to leave your webpage for your competitors because of insufficient information. That’ll reduce your bounce rate, which will boost your rankings on search results pages.
Why Do You Need a Product Description?
Product descriptions are important for the following reasons:
It creates a top-notch customer experience.
A good strategy for optimizing your product descriptions is to create a top-notch customer experience.
When you provide detailed and unique content for your potential shoppers, you enhance the optimal experience they will have when they visit your website’s product pages.
You can optimize your customer experience by providing high-quality and detailed product description pages that will boost the buying experience for your customers.
It Improves Search Engine Rankings
Besides creating unique and high-quality articles and blog posts for SEO purposes, you can also optimize your product description pages and make them SEO-friendly.
That way, you make your SEO campaigns much more likely to succeed. You have a higher probability of ranking higher on Google search engine result pages.
That’ll go a long way towards increasing the online presence of your eCommerce store, boosting organic traffic and driving up sales.
More Sales
When you create product descriptions that are rich with keywords, your product pages have a higher chance of featuring on search engine results pages.
They get in front of prospective customers more, which means more traffic and more sales for that particular product. Product description optimization garners high-quality leads for your business, which helps in sales maximization.
Product Description Optimization Techniques for SEO
.jpg)
Now that you know what the product description is and why it is important, let’s dive into the meat of this article.
1. Get to Know Google’s Algorithm
Google is the most popular search engine on the internet and takes up 86% of the eCommerce market.
If you’re serious about optimizing your product pages, then you need to comply with Google’s rules or else you’ll be missing out on a great amount of traffic.
Here are some of the most important tips to follow:
● Familiarize yourself with Google Indexing: Indexing is the process whereby Google Bots scan through your web pages to figure out what your content is about. The Googlebot goes through your written content, images, videos, and other metadata to find relevant information that matches a consumer search query.
If your content matches the search query, then the bots will add your website to the search result pages. Therefore, create concise, meaningful, and SEO-friendly meta titles so that Google bots will understand your content better and faster.
● Apply meta tags and meta description: This point also goes in line with the above. Meta tags and meta descriptions help Googlebot understand your website better. Meta descriptions are relevant because Google will feature them on the page results.
2. Target the Right Audience
When consumers visit your website, it’s because they think they can find content related to their search query on your product pages.
Therefore, you must craft a product description that will attract the right customers because they are more likely to buy your products if your content resonates with their search query.
Carry out a detailed audience analysis and find out the customers that are best for your business.
Here are a few tips:
● Assess your current customers: A good way of conducting audience analysis is by identifying who your current customers are. Examine their behavior, demographics, and other details you can research that’ll contribute to more sales. That’ll provide you with a clearer picture of whom you should target.
● Engage in competitor research: When you are not sure about how to go about audience analysis, a good place to begin is to assess who your competitors’ customers are. That way, you’ll know who your target audience is because they are your competition for a reason.
● Customer survey: Carrying out a customer survey is a very strong arsenal in your audience analysis armory. By getting the opinions and thoughts of your actual customers, you get better insights into their interests, demographics, values, and how you can improve your brand.
When you complete your audience analysis and know who your target audience is, make sure your product pages, copy, and overall content are directed at them. That will provide your customers with an enhanced shopping experience.
3. Include Keywords in Product Descriptions
This strategy is very potent because it provides Google bots with the tools they need to index your product pages and rank them.
Featuring keywords in your product descriptions and titles helps the bots understand your descriptions better and faster.
During your keyword research, look for keywords and phrases that customers are likely to search for and include them in your product titles and descriptions.
Long-tail keywords play a key role in this process because they are very specific.
The customer that uses this type of keyword is further down the sales funnel and is very likely to purchase if your product is relevant to the search query.
4. Use Extensive Product Descriptions
Make sure your product descriptions are very detailed because you’re creating them for your customers.
They should tell your prospective buyers about the products, what they are, the features, the benefits they’ll get from using the product, and why they should buy from you and not from your competitors.
Remember to include high-quality product images. Try to think of any potential questions that your customers may ask and answer them in your product descriptions.
You don’t want your shoppers to have any doubts concerning your products because that will increase the chances of abandoned carts.
5. Write Unique Product Descriptions
Never create duplicate content for your product description, as this will work against what we’re trying to achieve.
Google frowns on duplicate content and will rank your website low if you are a culprit.
Take time to create product descriptions that are unique and different from the content you have on other web pages. They should also be different from those of your competitors.
You can create unique content by employing different people to create product descriptions for you. That makes it harder to create similar product descriptions.
Additionally, check your content online for duplicates and make corrections where relevant.
6. Landing Page Optimization
Your landing pages are one of the most important pages on your website because they help your clients find the products they searched for, and for this reason, this strategy is important.
If you don’t optimize your website’s landing pages, your potential buyers will not find it easy to get the products they need. That’ll increase your bounce rate, which will directly affect your SEO rankings.
So, how can you optimize your landing page?
● Use clear headlines: Use clear and succinct headlines at the top of your landing pages so that visitors will know exactly what your products are. Otherwise, they’ll leave your site faster than they came in.
● Your call-to-actions should be clear: Your product descriptions and other SEO strategies are useless if you don’t have a clear and compelling call-to-action. It is one of the critical elements you need to have on your landing pages. Place them strategically, use clear and compelling words, and choose appealing colors. These can be a dealbreaker for you.
● Offer personalization to your customers: 44% of online shoppers value personalization so much that they will go from one brand that doesn’t provide it to one that does. The reason is that personalization boosts the entire shopping experience. Place your landing page in a specific location, offer product suggestions to your customers, and use language that they understand.
Conclusion
Product description optimization is the process whereby you describe your products in such a way that they are more appealing to customers.
It is an important part of your marketing strategy because it helps to direct more organic traffic to your webpage and increase conversions. Start optimizing your product descriptions today and you’ll see the difference it’ll make.
Guidance of adding Missing Favicon
Please kindly follow the guidelines below with sample screenshots on how to fix “Missing Favicon” issue.
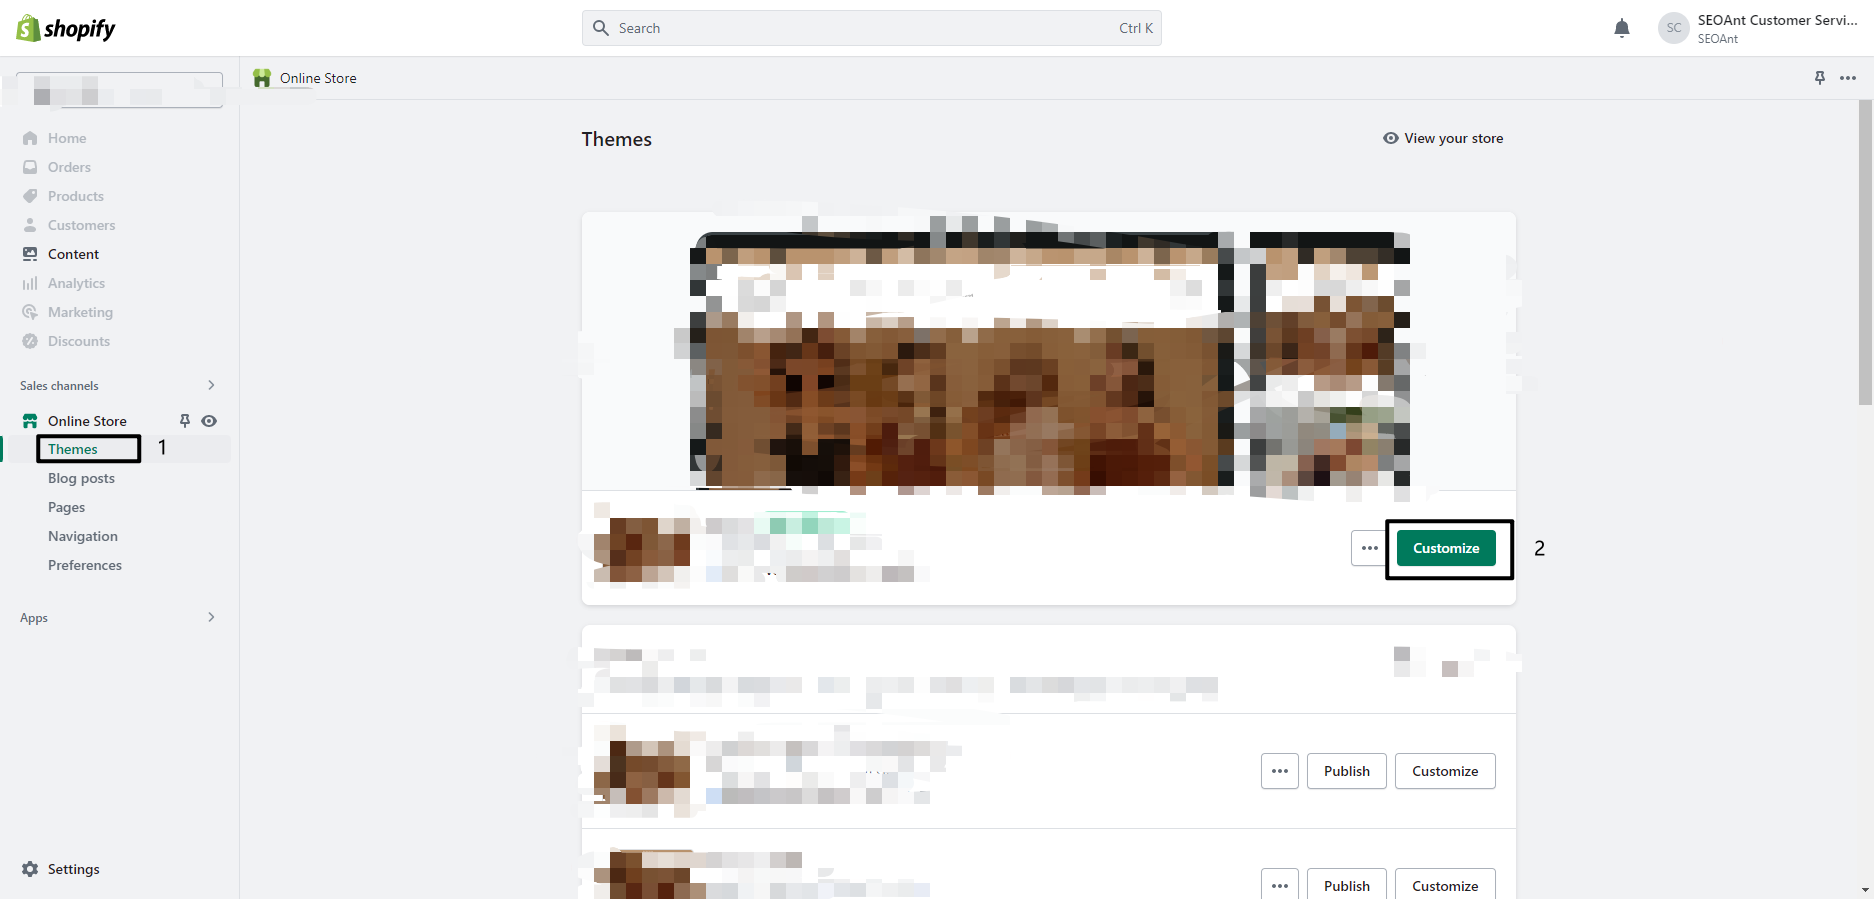
1. Go to your Shopify –> Online Store –> Themes
2. Click Customize button.
3. Select Theme settings.
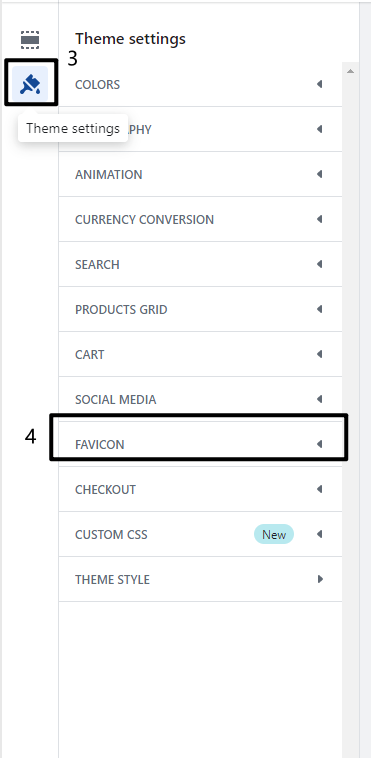
4. Select Logo option and you will see Favicon under it. Please select related images as a Favicon or upload another image as a Favicon after clicking Select image.