
You’ve spent weeks perfecting your Shopify store—selecting products, crafting descriptions, designing the perfect layout. You hit publish, wait a few days, and then search for your store on Google. Nothing. It’s like your store doesn’t exist.
Here’s the frustrating truth: Google can’t rank what it can’t find. This is where XML sitemaps become your secret weapon.
In this comprehensive guide, you’ll learn exactly what XML sitemaps are, how Shopify handles them automatically, and most importantly, how to submit your sitemap to Google in less than 10 minutes.
Table of Contents
What are XML Sitemaps for Shopify?
Think of an XML sitemap as a detailed roadmap of your entire online store that you hand directly to search engines like Google.
The Technical Definition of SML Sitemaps
An XML sitemap is a file – specifically a .xml file – that lists all the important pages on your website in a structured format that search engines can easily read. For your Shopify store, this includes:
- Product pages (every item you sell)
- Collection pages (your product categories)
- Blog posts (if you’re running a blog)
- Static pages (About Us, Contact, etc.)
- Images (yes, there’s a separate image sitemap too!)
The XML format is a language that search engines understand perfectly. While it looks like gibberish to humans (lots of angle brackets and tags), it’s crystal clear to Google’s crawling robots.
What Makes It Different from Your Navigation Menu?
Your website’s navigation menu is built for people – it’s visual, it has the most intuitive information, and it’s pretty easy to use. An XML sitemap, however, is built for search engine bots. It has technical info about your website that allows the bots to intelligently make decisions about how to crawl and index your content:
- Priority levels (which pages are most important)
- Update frequency (how often pages change)
- Last modification dates (when content was updated)
- URL structure (the complete path to every page)
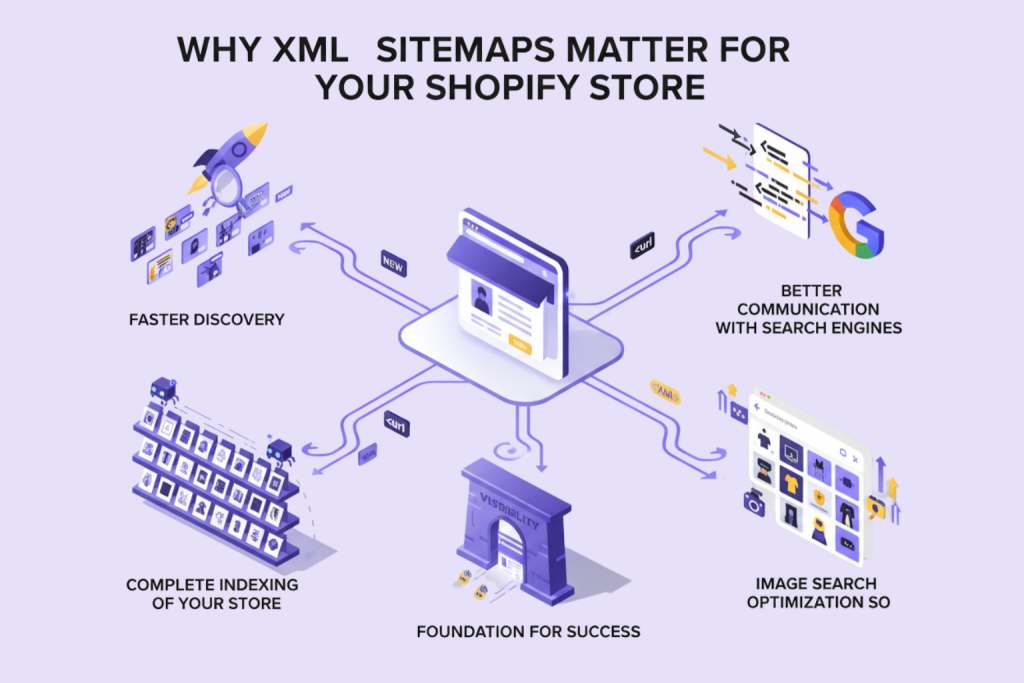
Why XML Sitemaps Matter for Your Shopify Store
You might be thinking, “Can’t Google just find my pages by clicking through my site like a regular visitor?” Technically, yes – but there are several compelling reasons why that’s not enough.
1. Faster Product Discovery
With a properly submitted sitemap, Google knows exactly where to find your new products immediately. Your sitemap essentially sends Google a notification: “Hey, I just added 15 new products – here are the URLs!”
2. Complete Indexing of Your Store
Large Shopify stores with hundreds or thousands of products face a particular challenge: crawl budget limitations. Google doesn’t have unlimited time to crawl every single page on every website. A well-structured sitemap helps Google prioritize which pages to crawl first and ensures that important pages don’t get overlooked.
3. Better Communication with Search Engines
Your XML sitemap tells Google which pages you consider important and which ones change frequently. For example:
- Your homepage might be marked as “high priority” and updated daily
- Individual product pages might be marked as “medium priority” and updated weekly
- Your About Us page might be “low priority” and rarely updated
This metadata helps Google make intelligent decisions about when and how often to recrawl your pages.
4. Image Search Optimization
Shopify creates an image sitemap automatically in addition to your main sitemap. This is important for having your images associated with your products to show up in Google Image Search, and it can send a lot of customers to your store! A lot of shoppers start their product research by searching images, so it’s a great potential source of customers!
5. Foundation for SEO Success
While submitting a sitemap won’t magically skyrocket your rankings overnight, it’s an essential foundation for all your other SEO efforts. Think of it as making sure your store’s front door is unlocked and clearly marked before you start advertising your business.
Shopify’s Automatic Sitemap Generation
Here’s where Shopify makes your life significantly easier: You don’t need to create or maintain a sitemap manually. Unlike many other e-commerce platforms where you need plugins or technical knowledge, Shopify handles everything automatically.
How Shopify Creates Your Sitemap
The moment you launch your Shopify store, the platform immediately begins generating and maintaining your XML sitemaps. Here’s what happens behind the scenes:
- Automatic Creation: Shopify scans your entire store and compiles a list of all important URLs
- Continuous Updates: Every time you publish a new product, create a blog post, or add a page, Shopify updates your sitemap within minutes
- Structured Organization: Shopify organizes your sitemap into logical sections (products, collections, pages, blog posts)
- Technical Optimization: Shopify ensures proper XML formatting and includes all the necessary metadata
Where to Find Your Shopify Sitemap
Your Shopify sitemap lives at a predictable, standard location. No matter what your store name is, you can always access it using this format:
yourstore.com/sitemap.xml
For example:
- If your store is
amazingshoes.myshopify.com, your sitemap is atamazingshoes.myshopify.com/sitemap.xml
Try it right now: Open a new browser tab and type in your store URL followed by /sitemap.xml. You should see something that looks like a structured list of XML files.
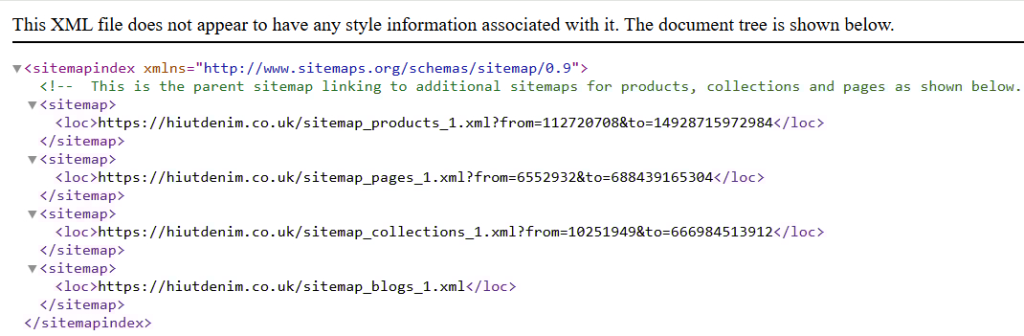
Understanding Shopify’s Sitemap Structure
When you visit your sitemap URL, you’ll notice it’s actually a “sitemap index”—a master sitemap that links to several smaller, specialized sitemaps. This is Shopify’s smart way of organizing large stores.
You’ll typically see these individual sitemaps:
sitemap_products_1.xml– All your product pagessitemap_collections_1.xml– Your collection/category pagessitemap_pages_1.xml– Static pages like About, Contact, etc.sitemap_blogs_1.xml– Your blog posts (if you have a blog)sitemap_images_1.xml– All product and page images
For large stores, Shopify might create multiple numbered files (products_1, products_2, etc.) to keep things organized, as each sitemap file has a 50,000 URL limit (though you’re unlikely to hit this unless you have an enormous catalog).
Checking Your SEO Visibility Settings
Sometimes store owners can’t figure out why certain pages aren’t appearing in their sitemap. The most common culprit? SEO visibility settings.
Here’s how to check:
- From your Shopify admin, go to Online Store → Preferences
- Scroll down to the Search engine optimization section
- Make sure the checkbox for “Discourage search engines from indexing this store” is UNCHECKED
This setting is sometimes enabled by default when you’re building your store, and forgetting to disable it is one of the most common reasons why new stores don’t appear in search results.
For individual pages, you can also control visibility:
- When editing a product, collection, or page
- Scroll to the Search engine listing preview section
- Ensure the page isn’t set to “hidden from search engines”
Step-by-Step: Submitting Your Shopify Sitemap to Google
Now for the crucial part: telling Google about your sitemap. This is where many Shopify store owners get stuck, but we’re going to walk through it together step by step.
Prerequisites Check
Before we begin, let’s make sure you have everything ready:
✅ A Google account (Gmail works perfectly)
✅ Your store is published and accessible (not password-protected)
✅ “Discourage search engines” is turned OFF in Shopify settings
✅ Your store has at least a few products/pages published
Got all that? Great! Let’s dive in.
Part 1: Setting Up Google Search Console
Google Search Console (GSC) is a free tool from Google that lets you monitor how your site appears in Google search results. It’s where you’ll submit your sitemap and track your indexing progress.
Step 1: Access Google Search Console
- Open your browser and go to “search.google.com/search-console“
- Sign in with your Google account
- If you’ve never used GSC before, you’ll see a welcome screen. Click “Start now” or “Add property”
Step 2: Add Your Shopify Store as a Property
You’ll see two options for adding your property:
Option A: Domain Property (Verifies all versions of your URL)
Option B: URL Prefix (Verifies specific URL version)
For most Shopify stores, we recommend URL Prefix because it’s easier to verify. Here’s what to do:
- Select “URL prefix”
- Enter your exact store URL including
- Example:
https://amazingshoes.com/ - If you’re still using your myshopify.com domain:
https://amazingshoes.myshopify.com/
- Example:
- Click “Continue”
Important: Make sure you include https:// and use the exact URL customers see when visiting your store.
Part 2: Verifying Store Ownership
Google needs to confirm that you actually own this Shopify store before letting you submit a sitemap. There are several verification methods, but we’ll focus on the easiest one for Shopify users.
Recommended Method: HTML Tag Verification
This is the most straightforward method for Shopify stores and doesn’t require accessing your domain provider.
Step 1: Get Your Verification Code
After clicking “Continue” in the previous step, Google will show you several verification options. Look for “HTML tag” and click it.
You’ll see something like this:
<meta name="google-site-verification" content="1234567890abcdefghijklmnop" />
Step 2: Copy This Entire Tag
Click the “Copy” button next to the code. We’re going to add this to your Shopify theme.
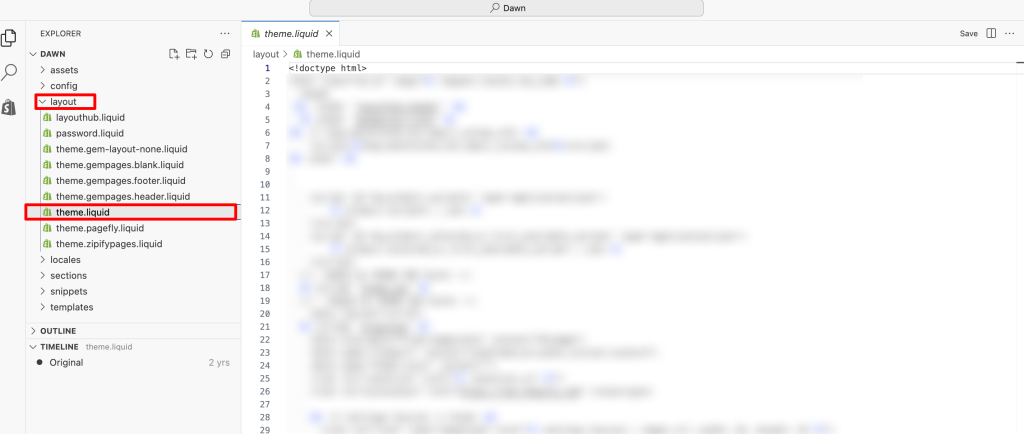
Step 3: Add the Tag to Your Shopify Theme
- Open a new browser tab and go to your Shopify admin
- Click Online Store → Themes
- Find your current (active) theme
- Click the “Actions” button → “Edit code”
- In the left sidebar under “Layout”, click on
theme.liquid - Use Ctrl+F (or Cmd+F on Mac) to search for
</head> - Paste your verification code just before the
</head>tag - Click “Save” in the top right

What it should look like:
  <meta name="google-site-verification" content="your-code-here" />
</head>
Step 4: Verify in Google Search Console
- Go back to the Google Search Console tab
- Click the “Verify” button
- If successful, you’ll see a green checkmark and “Ownership verified” message
Troubleshooting: If verification fails:
- Wait 1-2 minutes and try again (sometimes there’s a delay)
- Double-check that you pasted the code exactly as provided
- Make sure you saved the theme.liquid file
- Clear your browser cache and try verifying again
Alternative Method: Google Analytics
If you already have Google Analytics installed on your Shopify store, verification is even easier:
- Choose the “Google Analytics” verification method
- Make sure you’re signed into the same Google account that has access to your Analytics property
- Click “Verify”
That’s it! This method works instantly if your Analytics is properly configured.
Part 3: Submitting Your Sitemap
Now for the moment we’ve been building toward—submitting your Shopify sitemap to Google!
Step 1: Navigate to the XML Sitemaps Section
- In Google Search Console, look at the left sidebar
- Click on “Sitemaps”
- You’ll see a simple interface with a field that says “Add a new sitemap”
Step 2: Enter Your Sitemap URL
Here’s the key: You only need to enter the sitemap filename, not the full URL.
In the text field, simply type:
sitemap.xml
That’s it! Don’t include https://\ or your domain name—GSC already knows your store URL from when you added the property.
Step 3: Click Submit
Click the “Submit” button. Within seconds, you should see your sitemap appear in the list below with a status of “Success” or “Fetching”.
Understanding the Submission Results
Google will show you some important information about your sitemap:
- Discovered URLs: How many pages Google found in your sitemap
- Status: Whether the sitemap was successfully read
- Last read: When Google last checked your sitemap
Normal Results:
- Status: Success
- Discovered: Should roughly match your product count + collections + pages + blog posts
- Type: Sitemap index (because Shopify uses multiple sitemaps)
Optional: Submit Individual Sitemaps
For more detailed tracking, you can also submit Shopify’s individual sitemaps:
sitemap_products_1.xml
sitemap_collections_1.xml
sitemap_pages_1.xml
sitemap_blogs_1.xml
This gives you more granular data about how each section of your store is being indexed, but submitting the main sitemap.xml is usually sufficient.
What Happens Next?
After submission, here’s the typical timeline:
Immediately: Google adds your sitemap to its crawl queue Within 24-48 hours: Google begins crawling pages from your sitemap Within 1-2 weeks: You’ll start seeing pages appear in Google’s index Within 2-4 weeks: Most or all of your pages should be indexed (depends on store size)
Important: Submitting a sitemap doesn’t guarantee immediate indexing or high rankings. It simply helps Google discover your pages faster. The actual ranking depends on content quality, backlinks, and hundreds of other factors.
Frequently Asked Questions
Q: Do I need to create a sitemap for my Shopify store?
A: No! This is the best part about Shopify—your sitemap is created automatically the moment your store goes live. You don’t need any coding skills, plugins, or third-party apps. Your job is simply to submit it to Google Search Console, which takes less than 10 minutes.
Q: How often does Shopify update my sitemap?
A: Shopify updates your sitemap automatically and immediately whenever you:
- Publish a new product
- Update an existing product
- Create or modify a collection
- Publish a blog post
- Add or change a static page
The updates happen within minutes. You never need to manually regenerate or resubmit your sitemap.
Q: Can I customize my Shopify sitemap?
A: Shopify provides limited customization options, and for most store owners, customization isn’t necessary or recommended. The automatic sitemap is optimized for e-commerce and includes all the right pages with proper priority settings.
Advanced users with specific needs can control which pages appear by adjusting the SEO visibility settings for individual products, collections, or pages, but this should be done carefully.
Q: How long does it take for Google to index my Shopify store?
A: Typical timelines vary based on several factors:
- First pages indexed: 2-7 days after sitemap submission
- Significant indexing progress: 2-4 weeks
- Complete indexing: 4-8 weeks for stores with 100-500 products
- Large stores (1,000+ products): 2-3 months for complete indexing
Brand new domains with no authority take longer. Established domains or stores with quality backlinks index faster.
Q: My sitemap shows errors in Google Search Console. What should I do?
A: Don’t panic! First, identify the specific error:
- “Couldn’t fetch”: Check that your store isn’t password-protected and “discourage search engines” is disabled
- “Submitted URL not found (404)“: Usually old URLs; set up 301 redirects in Shopify
- “Discovered – currently not indexed”: Improve content quality and be patient
- “Duplicate content”: Write unique product descriptions
Most errors resolve with patience and content improvements. Focus on the errors affecting the most pages first.
Q: Should I submit my sitemap to Bing too?
A: Yes! While Google dominates search, Bing powers about 10-15% of searches in the US and UK, including Microsoft Edge, Siri, and Alexa results.
To submit to Bing:
- Visit Bing Webmaster Tools
- Follow the same process: add your site, verify ownership, submit
sitemap.xml - Bonus: You can import your GSC verification automatically
Q: Will submitting a sitemap immediately improve my rankings?
A: No, sitemaps don’t directly affect rankings. They help with discovery and indexing, which is the prerequisite for ranking.
Think of it this way:
- Without a sitemap: Your pages might never be found (can’t rank)
- With a sitemap: Your pages get indexed faster (can potentially rank based on content quality and other factors)
Sitemaps are a foundation for SEO success, not a shortcut to high rankings.
Q: How many URLs should my Shopify sitemap contain?
A: This depends entirely on your store size. A typical calculation:
Number of products + Number of collections + Number of blog posts + Static pages = Total URLs
Example store:
- 250 products
- 25 collections
- 40 blog posts
- 5 static pages (About, Contact, FAQ, etc.)
- Total: ~320 URLs
Don’t worry if your sitemap seems large—Shopify and Google can handle sitemaps with thousands of URLs efficiently.
Q: What if I have multiple Shopify stores?
A: You need to set up Google Search Console separately for each store:
- Add each store as a separate property in GSC
- Verify ownership for each one
- Submit the sitemap for each store individually
Each store has its own unique sitemap at its respective domain, so they’re tracked completely separately.
Conclusion: Your Store is Now Discoverable
Congratulations! You’ve just completed one of the most important foundational steps for your Shopify store’s SEO success.
Let’s recap what you’ve accomplished:
✅ Understood XML sitemaps and why they’re crucial for search visibility
✅ Located your automatic Shopify sitemap (yourstore.com/sitemap.xml)
✅ Set up Google Search Console and verified your ownership
✅ Successfully submitted your sitemap to Google